• Hi all and welcome to TheWoodHaven2 brought into the 21st Century, kicking and screaming! We all have Alasdair to thank for the vast bulk of the heavy lifting to get us here, no more so than me because he's taken away a huge burden of responsibility from my shoulders and brought us to this new shiny home, with all your previous content (hopefully) still intact! Please peruse and feed back. There is still plenty to do, like changing the colour scheme, adding the banner graphic, tweaking the odd setting here and there so I have added a new thread in the 'Technical Issues, Bugs and Feature Requests' forum for you to add any issues you find, any missing settings or just anything you'd like to see added/removed from the feature set that Xenforo offers. We will get to everything over the coming weeks so please be patient, but add anything at all to the thread I mention above and we promise to get to them over the next few days/weeks/months. In the meantime, please enjoy!

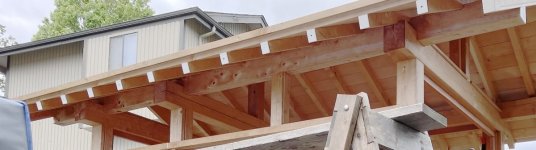
A Japanese style garden shed

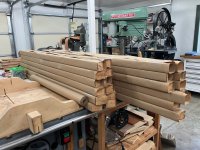
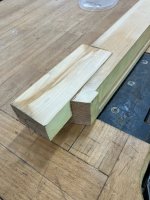
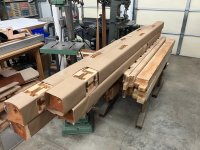
I'm finally getting back to the shed and this thread. I have a spot for the foundation picked out at the new home, shown elsewhere. Now I'm hand planing off the dirt and sticker stains from the exposed beams and posts. I've also decided to wrap the cleaned up parts with kraft paper. This is sometimes done in Japan to avoid getting fingerprints and dirt on the unfinished wood surface. I didn't do this the first time around since I thought it was too fussy for a garden shed and I was sorry I didn't. Those hand and fingerprints don't wash off and don't fade. They can be sanded off of course but that ruins the hand planed surface. With openings cut for the joinery the shed can still be assembled and then the paper removed when it is safe to do so.
6B8078E1-C974-46F0-907B-33AE4B45C7A0.JPG
 
This is awesome. I have been wanting to try something like this and feel I could do the cuts, but i’m not sure where to learn how to layout the marks and measurements. Where dod you learn that part?
 
In respect of weather. Will you need to change / adapt anything for its new location.
Alex.
That's a very good question. Oregon had mild wet winters and warm arid summers. Indiana has mid-continent extremes of cold sometimes snowy winters and hot very humid summers. About like the weather in Tokyo, as I understand it to be.

I built the roof for a worst case Oregon snow load. The shed is likely to see a greater snow load here at least once in awhile but I'm pretty sure the roof can handle it.

I am going to use a lime plaster exterior over a rainscreen gap. I think it will be weather resistant enough for either climate.

Termites may be more of an issue here than in Oregon. The wood I'm using is reportedly insect resistant and I'll be treating with a borate salts wash as I did in Oregon so I'm not too worried.

So overall I guess no changes to the design. Except I will have to do some regrading. The original site sloped back to front a few inches and I adjusted the length of the posts to accommodate that. Here the site slopes front to back but I can't now change the post lengths. I have an excavator coming soon to do work on our septic field so I'm going to ask him to push some dirt over the shed site to help me out there.
 
This is awesome. I have been wanting to try something like this and feel I could do the cuts, but i’m not sure where to learn how to layout the marks and measurements. Where dod you learn that part?
I was in exactly the same place when I started: a furniture making background but no carpentry or timber framing experience. I'm learning with a combination of books, youtube videos, and a few contacts I've made with Japanese contractors.

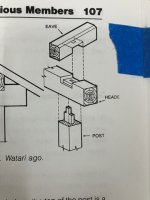
The best book in English I've found to start with is "The Complete Japanese Joinery" by Sato and Nakahara. It may be out of print. This is a actually a compressed version of two different books with chapters missing from both originals which leaves some odd gaps and duplications but still the best source out there. For detailed joinery layout/setout/markout I like this book in Japanese by Shinzo Togashi, roughly translated as Traditional Carpentry Joints. ISBN 978-4-274-06971-0. I think I bought it from Amazon Japan. Even though the text is Japanese it is mostly detailed drawings set out in fractions scaled to the size of your posts and readable for English speakers. For example a mortice width will be 1/4 the post width.


695C1D71-DD74-4587-B495-3326203856FE_4_5005_c.jpeg04EC2E54-2174-4854-95D1-C9E1197B9839_4_5005_c.jpeg

All Japanese joints are set out from centre lines. A Japanese framing square (sashigane) makes setting out relatively simple. A story pole/stick to transfer markings is extremely helpful.
 
I was in exactly the same place when I started: a furniture making background but no carpentry or timber framing experience. I'm learning with a combination of books, youtube videos, and a few contacts I've made with Japanese contractors.

The best book in English I've found to start with is "The Complete Japanese Joinery" by Sato and Nakahara. It may be out of print. This is a actually a compressed version of two different books with chapters missing from both originals which leaves some odd gaps and duplications but still the best source out there. For detailed joinery layout/setout/markout I like this book in Japanese by Shinzo Togashi, roughly translated as Traditional Carpentry Joints. ISBN 978-4-274-06971-0. I think I bought it from Amazon Japan. Even though the text is Japanese it is mostly detailed drawings set out in fractions scaled to the size of your posts and readable for English speakers. For example a mortice width will be 1/4 the post width.


View attachment 57711View attachment 57714

All Japanese joints are set out from centre lines. A Japanese framing square (sashigane) makes setting out relatively simple. A story pole/stick to transfer markings is extremely helpful.
Excellent, thank you! This is very helpful.
 
Steve, if you can get up to the Bay area in October you might be interested in attending the Kezouro-kai meeting.
Yeah its definitely on my list. There is also the school up in Port Townsend Washington I believe that sometimes has some Japanese woodworking courses there? I know there are a few craftsmen up in the area that specialize in Japanese style of building like this one https://www.mokuchiwoodworking.com/visit
I did road trip up through Oregon a couple months ago but we had a tight timeline.
 
Gary, only just came across this thread. I have one word...

WOW! Stunning house, layout, the Japanese shed is fantastic and is the first thing I have seen in a long, long time to rekindle any interest in 'proper' woodworking. I must not show it to my wife
 
Yes, Port Townsend School of Woodoworking offers Japanese carpentry classes. In fact they had a Japanese woodworking festival last Saturday. One of the instructors there, Dale Brotherton in Seattle, has helped me with my shed design. Another instructor, Yann Giguere in Ashland, Oregon, is another good resource. Karl Bareis at Santa Cruz Timber Frames also does excellent work. I don't know whether he teaches apart from his work with Kezouro-kai.
 
Yes, Port Townsend School of Woodoworking offers Japanese carpentry classes. In fact they had a Japanese woodworking festival last Saturday. One of the instructors there, Dale Brotherton in Seattle, has helped me with my shed design. Another instructor, Yann Giguere in Ashland, Oregon, is another good resource. Karl Bareis at Santa Cruz Timber Frames also does excellent work. I don't know whether he teaches apart from his work with Kezouro-kai.
I have heard of Dale Brotherton. I think he actually wrote THE book on sharpening japanese planes etc.
 
Remember this build very well, I was one of the “take it with you crew” and here we are again for the rebuild. Don’t suppose it’s possible to swop the legs around re the ground sloping the wrong way?
Ian
 
What a great project... 👍 and one I'm going to have to find the time to go back to the beginning of. Started on p1 but, being now on p11, skipped a couple and wanted to get to why it had started again... Give me time and I'll get there. Fantastic from what I've seen so far.

Your latest comments indicate a *move* and relocation so I really must get up to speed and go back over the thread.

Frank
 
What a great project... 👍 and one I'm going to have to find the time to go back to the beginning of. Started on p1 but, being now on p11, skipped a couple and wanted to get to why it had started again... Give me time and I'll get there. Fantastic from what I've seen so far.

Your latest comments indicate a *move* and relocation so I really must get up to speed and go back over the thread.

Frank
Long story short: Last summer we moved from Corvallis, Oregon to Bloomington, Indiana. We disassembled the nearly completed shed and brought it with us. The first house we moved into didn't work out and we moved again last month to a better one in the same town. The shed parts have been in storage during the moves. I hope to re-raise the frame in October.
 
Don’t suppose it’s possible to swop the legs around re the ground sloping the wrong way?
Ian
No, the posts are asymmetrically shaped. Only one way to put them together. The plan is to recreate the slope by adjusting the heights of the concrete piers and then adjust the grade to fit. The difference I need is about 6 inches from back to front over a distance of 6 ft.
 
Long story short: Last summer we moved from Corvallis, Oregon to Bloomington, Indiana. We disassembled the nearly completed shed and brought it with us. The first house we moved into didn't work out and we moved again last month to a better one in the same town. The shed parts have been in storage during the moves. I hope to re-raise the frame in October.
Appreciate you bringing me up to speed Gary 😊. I'll still take a look back but will look forward to your following posts on this 👍
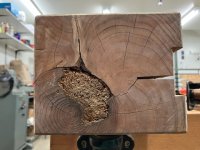
 
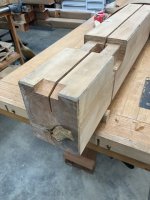
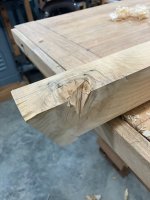
I need some opinions, please. One of the tie beams has a partially rotted pith exposed at one end. I do not know how deeply the rot extends.

8727C2ED-EF00-4300-A075-11CE857AB819_4_5005_c.jpeg

This end is tucked under the eave and not directly exposed to rain It is the left most on the picture below. On the original assembly I left it like this. Now I'm thinking I might want to use linseed oil to paint the end grain both to limit water intrusion and for esthetics. I used white linseed oil paint on the more exposed top plates and rafter end grain so doing so on the tie beams and rafters would be a match.

2075021B-D367-4BEA-9E4A-833E9E7205A1_1_201_a.jpeg

I would not paint the rotted area directly but instead consolidate and fill with epoxy for a smooth surface, then paint. I understand using epoxy is fairly common for timber end repairs. But I have also read that there are concerns that epoxy fillers can cause longer term damage because they are water impermeable and can trap moisture behind the repair and actually accelerate decay around the fix.

So I'm facing a few options. A) do nothing. The wood is now dry and the beam should last longer than I will. If someone sometime in the future wants to repair or replace the beam that is on them. B) Epoxy fill and paint for the esthetic gain, hope that the repair lasts longer than I do. C) perhaps a third option is to construct metal end caps to better protect from driven rain. D) purchase a replacement beam now.
 
I think if I was in that situation I would be digging as much of the soft (rotted) wood out that I could and then treat with a wood hardener and a fungicide - depends what is available to you over your side of the pond.

As the building is dismantled I'd try to put the beam vertical and pour the fungicide/wood hardener into the hole and allow it to puddle so it soaks into any soft wood that couldn't be removed. Continue to do such until it stops soaking in. Then mix an appropriate epoxy resin filler to fill the hole. It really depends on how deep it goes and how much possible weakness removing the rotten wood may bring to the beam for the weight load it may be put under.

Because the beam is uninstalled, you can easily add mechanical strength if the rot took out a significant portion of the wood.

Epoxy fills the void, but adding metal or timber reinforcement ensures structural integrity.Internal Dowel Reinforcement: Before packing the epoxy putty, drill two or three deep holes into the healthy wood core through the rotted end. Drive fiberglass or stainless steel rebar rods into the holes, leaving them protruding into the cavity. Pack the epoxy around them to create an incredibly strong reinforced core.

Just my thoughts... may be of some help but others with far more experience may come up with a better way to proceed 🤞
 
Thanks. While walking the dogs this morning I had another potential fix: chopping out the rotted part and patching in a Dutchman. I'm not sure how that would look so I'm going to have to stare at it for awhile.
 
For exposed ends on my frame, I've wrapped a bit of 0.7mm copper sheet over. It's not tightly applied so air can flow but completely protected from rain. The copper weathers really nicely. I'd recommend anything applied should be breathable as much as possible
 
Looking at your picture again, I'm not sure if you have a ridge beam but you probably do. I wonder have you dealt with thrust then so there's not much push outwards on those plates. I don't think I'm worried about the rot in terms of strength unless the ends are providing relish. Linseed sounds good. Here's a pic just taken of plates with copper ends, darkened down quite a bit.

PXL_20260822_182630983.jpg
 
Late to the party here, but
1 I like the way you have scribed the posts to the stones. I have a project coming up (this year, next year, sometime, never) which could definitely benefit from that.
2 Mike - My granddad had a plumb line exactly as you describe.

S
 
Looking at your picture again, I'm not sure if you have a ridge beam but you probably do. I wonder have you dealt with thrust then so there's not much push outwards on those plates. I don't think I'm worried about the rot in terms of strength unless the ends are providing relish. Linseed sounds good. Here's a pic just taken of plates with copper ends, darkened down quite a bit.
That's lovely. Yes, I do have a ridge beam. The joinery is exactly as here, except what I'm calling a tie beam they call a header, and my top plate is their eave beam. The rotted core is in the relish beyond the cogged lap joint.

D584ECC1-D8BE-4A1A-A3FC-A264B82193B0_4_5005_c.jpeg

Here is a better view of the beam in its proper orientation. The notch is for a rafter.


EAFA6E07-41CA-4845-A1FA-A9D980E54EA4_4_5005_c.jpeg
 
Late to the party here, but
1 I like the way you have scribed the posts to the stones. I have a project coming up (this year, next year, sometime, never) which could definitely benefit from that.
2 Mike - My granddad had a plumb line exactly as you describe.

S
The scribed posts are my favorite part of this. In Japanese this foundation scheme is called ishibatate or ishibadate 石場建て , which I have seen loosely translated as "standing on stones." I did not exactly find it difficult to do but it did require patience to chisel, fit, chisel more, fit more.
 
View attachment 57760

Here is a better view of the beam in its proper orientation. The notch is for a rafter.


View attachment 57761
[/QUOTE]

Very nice to see the internals. While we're not sure how far back the rot goes, there's enough "meat" on that beam to do the work. The eaves beam/plate looks like it's doing most of the roof work. I think I'm reassured and would tend to treat as a cosmetic job.
 
Instead of epoxy would a Lime based mortar be better. Wouldn't be a stronger repair but would be porous.
After removing as much rot and treating with chemicals etc.

Alex.
 
Is the infected area soft enough to get a probe in so as to feel how deep the rot has gone?
If it’s not too deep I would treat with something that will kill the infected area, the just leave it.
I would shy away from filling the infected area with anything that doesn’t allow the area to breathe. I’ve seen this done in the past and if the wot is not completely removed it just comes back
 
Is the infected area soft enough to get a probe in so as to feel how deep the rot has gone?
If it’s not too deep I would treat with something that will kill the infected area, the just leave it.
I would shy away from filling the infected area with anything that doesn’t allow the area to breathe. I’ve seen this done in the past and if the wot is not completely removed it just comes back
I agree with what Jonathan says, kill it and leave it.
Ian
 
I mixed up some borate salts (Borax and boric acid) in ethylene glycol, heated and stirred until dissolved. A recipe from the internet that replicates a commercial product here called Boro Care. Then mixed a portion of that 1:1 with water and treated the rotted area and end grain of the beam. Left the wood out to dry in the shade until I'm ready to raise the frame.

Meanwhile, I had a very brief jichinsai ceremony again to pacify the local spirits before starting digging. This time I offered the spirits rice, salt, and a little Vermouth. (We gave up alcohol a couple years ago and the cooking vermouth was all we had around). Then I said a few silent words asking for a safe and successful build.


2645451A-1C4D-4BB5-87E4-ACFAAE486DA3.JPG

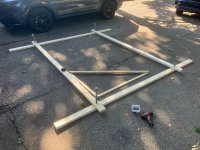
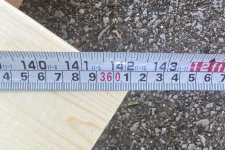
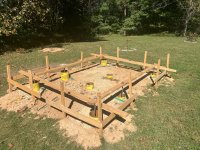
I also made the template to locate the threaded rods that will index the shed's posts. I used a 3/4/5 square to check the corners and measured the diagonals. I'm happy to report they are spot on. Within a mm or two over 3610 mm.

CDBAC0DF-1EE2-4515-82FC-1BE121C2CE78.JPG

A61E64B7-8E0F-45ED-86DE-74295E22E7A6_1_105_c.jpeg

45B78232-07AF-4427-8C1D-669788C9BB4B_1_105_c.jpeg
 

Attachments

  • 16235A97-746F-4526-8466-25DB4D718402.JPG
    16235A97-746F-4526-8466-25DB4D718402.JPG
    168.9 KB · Views: 1
Batter boards are up and leveled. The template is sitting on them temporarily.

3AC08848-C762-4EDF-8CAA-26F64344D225.JPG


I have resurfaced and wrapped all 24 rafters.

E1816862-171F-4BA5-8276-71E509D4C59F.JPG

One of them had a knot on one end work loose. I have a scrap cedar board left so I made a patch. Not a seamless fit but this will be up by the ridge beam and out of sight lines. The color will blend in a year or two.

57A438B4-04D5-4481-8103-2BC764FED585.JPG4847F211-EB5C-446B-82C3-0EC04A1E279F.JPG8DCEAB0C-81CC-4A86-A7BA-B13D77B01EB1.JPG4D1460EE-E178-412E-A272-F873D6F8F41B.JPG
 
Catching up here. I got the holes for piers augered out a couple of weeks ago and poured footers. Then it rained a bunch and all the holes filled with water a couple of inches deep. Took them awhile to drain. The last five days I've set the concrete forms with their tops at the same relative level as they were in Oregon (I hope) and wheel barrowed the bags of concrete down to the site from my driveway. Downhill, fortunately. I used the template to set the location of the thread rods and poured the concrete around them. Today I did a little regrading and covered the site with crushed limestone screened to what is called here #11's, about 1/2 to 1/4 inch. I like the tidy look. But after 5 days of concrete and stone work I am about done in. Hate to say it but I might be getting too old for this kind of work!

I have a couple days of prep and then the frame raising Saturday morning. FA685CAD-DA36-411D-BD00-6B4030CB0CD7.JPGCE4DC426-1B2D-4C16-88D8-245203B7B996.JPG6D2CB480-A88A-4D81-AF49-8FC7DD58CF6A.JPG
 
Didn't take any photos of them but visited Avebury in Wiltshire on Saturday (National Trust property, ancient stones, manor house etc.).

The main reception area/entrance is an old thatched barn. The pillars inside where resting on stones and reminded me of your construction of your Japanese Garden style garden shed. I intended to take photos but the wife dragged me away as time was limited and a lot to try to see (visit was for our 46th wedding anniversary on the Sunday).

Looking forward to your WIP on this new placement 😀

Did a search for it and came up with this link and copied a small part related to the pads:


Interior has tie beam trusses with struts to aisle posts supported on limestone pads, the posts deeply haunched. Raking struts to principal rafters and straight windbraces to single purlins. At ends, purlins supported by single re-used cruck blades. Purlin struts at half bays. Scarfs are square butt squinted joints. The barn contains much re-used timber but was re-numbered from the east end on erection. Restored 1978 for display of farm and country life.
 
Last edited:
I'm really looking forward to the re-construction - and I'm very glad that you managed to get the, erm, "shed" is far too crude a word for your creation... can I call it an okigoya (or is it a Cha-shitsu??) - anyway, I'm glad that the okigoya/cha-shitsu travelled to your new home and is back under re-construction there.
 
I'm in agreement with you Mark H... 'shed' is more than a tad 'crude'... but I asked Google as I'd not idea what the terms you used meant. This is the reply:

The correct term depends entirely on the purpose of the structure: if it is a utility or storage shed, okigoya is the correct term, but if it is an ornate garden structure built for hosting tea ceremonies, it should be called a cha-shitsu. [1, 2, 3]
Both of your member's terms are valid Japanese architectural words, but they refer to completely different things: [1, 2]

🛖 Okigoya (置き小屋) — The Storage Shed
  • What it means: A literal translation for a freestanding, detached hut or storage shed.
  • The exact garden term: In traditional landscaping, an authentic Japanese garden tool shed is referred to as a Niwamono Okigoya (庭物置小屋).
  • Use this name if: The structure is primarily meant for storing garden tools, soil bags, pots, firewood, or lawn equipment. [1, 2]
🍵 Cha-shitsu (茶室) — The Teahouse
  • What it means: A dedicated Japanese teahouse or tea room. [1, 2]
  • The exact garden term: These are architectural focal points of a tea garden (roji), built with specific elements like tatami mat flooring, a low crawl-in guest entrance (nijiriguchi), and a scroll alcove (tokonoma). [1]
  • Use this name if: The building is a refined, insulated space designed for sitting, entertaining, relaxing, or practicing traditional arts like the tea ceremony. [1, 2]
Summary Comparison

English TermProper Japanese (Rōmaji)Japanese KanjiPrimary Function
Garden Storage ShedOkigoya / Niwamono Okigoya置き小屋 / 庭物置小屋Storing tools, firewood, pots
Garden Tea HouseChashitsu茶室Tea ceremonies, relaxing

Question asked at the end by Google was:
To help settle the debate, what is the primary purpose of the build? Will it be used to store lawnmowers and tools, or will it be a seating space for relaxing?
 
Last edited:
I'm in agreement with you Mark H... 'shed' is more than a tad 'crude'... but I asked Google as I'd not idea what the terms you used meant. This is the reply:
The correct term depends entirely on the purpose of the structure: if it is a utility or storage shed, okigoya is the correct term, but if it is an ornate garden structure built for hosting tea ceremonies, it should be called a cha-shitsu. [1, 2, 3]
Both of your member's terms are valid Japanese architectural words, but they refer to completely different things: [1, 2]

🛖 Okigoya (置き小屋) — The Storage Shed
  • What it means: A literal translation for a freestanding, detached hut or storage shed.
  • The exact garden term: In traditional landscaping, an authentic Japanese garden tool shed is referred to as a Niwamono Okigoya (庭物置小屋).
  • Use this name if: The structure is primarily meant for storing garden tools, soil bags, pots, firewood, or lawn equipment. [1, 2]
🍵 Cha-shitsu (茶室) — The Teahouse
  • What it means: A dedicated Japanese teahouse or tea room. [1, 2]
  • The exact garden term: These are architectural focal points of a tea garden (roji), built with specific elements like tatami mat flooring, a low crawl-in guest entrance (nijiriguchi), and a scroll alcove (tokonoma). [1]
  • Use this name if: The building is a refined, insulated space designed for sitting, entertaining, relaxing, or practicing traditional arts like the tea ceremony. [1, 2]
Summary Comparison

English TermProper Japanese (Rōmaji)Japanese KanjiPrimary Function
Garden Storage ShedOkigoya / Niwamono Okigoya置き小屋 / 庭物置小屋Storing tools, firewood, pots
Garden Tea HouseChashitsu茶室Tea ceremonies, relaxing

Question asked at the end by Google was:
To help settle the debate, what is the primary purpose of the build? Will it be used to store lawnmowers and tools, or will it be a seating space for relaxing?

I actually used search terms to find these words as well - and my original search unearthed that a "shed" shed is apparently a koya, and that a slight elaboration on the "shed" shed is an "ornate" shed, apparently an okigoya. Extending the ornateness further gets you into tea-house territory - and since the shed in question is modelled as a tea-house, then the word for tea-house might be appropriate.

Perhaps we should suggest (you know, as complete and utter buffoons in our lack of actual knowledge of Japanese) maybe we could, maybe, combine both and coin the new term Chashitsu Okigoya???
 
Back
Top