
• Hi all and welcome to TheWoodHaven2 brought into the 21st Century, kicking and screaming! We all have Alasdair to thank for the vast bulk of the heavy lifting to get us here, no more so than me because he's taken away a huge burden of responsibility from my shoulders and brought us to this new shiny home, with all your previous content (hopefully) still intact! Please peruse and feed back. There is still plenty to do, like changing the colour scheme, adding the banner graphic, tweaking the odd setting here and there so I have added a new thread in the 'Technical Issues, Bugs and Feature Requests' forum for you to add any issues you find, any missing settings or just anything you'd like to see added/removed from the feature set that Xenforo offers. We will get to everything over the coming weeks so please be patient, but add anything at all to the thread I mention above and we promise to get to them over the next few days/weeks/months. In the meantime, please enjoy!

Accurate Chamfers

Blackswanwood

Old Oak
Joined
Jun 27, 2020
Messages
1,528
Reaction score
1,122
Location
North Yorkshire
Name
Robert
I am trying to do more by hand and less on the router table and wanted a way to do accurate and consistent 45 degree chamfers. I"m not sure but suspect I dredged this method up from the back of my mind having seen it on a Doucette and Wolfe Youtube video. If anyone knows an easier way please do share it.

First, I set a square to the depth of the item (I was half way through doing this one when I decided to ask for alternative suggestions hence the chamfer being half done)
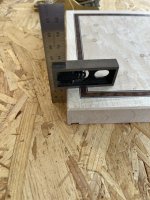
IMG_0709.jpg

Then carefully position it so the depth is the distance that the item is parallel to the edge of a work surface. (I'm using some OSB as my bench has a bevelled edge which screws up the geometry)
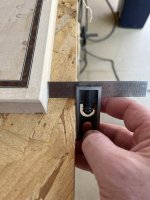
IMG_0714.jpg

Then use the edge of the work surface as a reference for the angle.
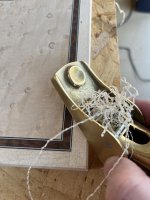
IMG_0717.jpg

The same result can be achieved without the square by folding the item back from the edge and trusting it's not slipped.

It's fairly easy to do with a block plane but larger items (i.e. the corresponding box to the lid in the picture) are more difficult as a bench plane has to be used which is a bit more unwieldy. It still gives a good result with a bit of care though.

Any thoughts on better methods will be very welcome.

Cheers

Robert
 
That's a neat way of being consistent, but it doesn't produce a 45 degree chamfer. The plane is at 45 degrees before you take the first stroke, but with each stroke you take away your reference and the angle reduces. (\pedant mode).
 
Mike G":2otdldxz said:
That's a neat way of being consistent, but it doesn't produce a 45 degree chamfer. The plane is at 45 degrees before you take the first stroke, but with each stroke you take away your reference and the angle reduces. (/pedant mode).

Good point - so I need to reduce the distance to the edge by the depth of the chamfer to get it spot on.

Thanks
 
Thanks for showing this method Robert. I have done all mine by eye in the past with so-so results but this gives a much neater result.
John
 
That's a useful tip, but it does take away an excuse for buying another old tool ... :( ;)
 
Blackswanwood":2vtxkelc said:
Mike G":2vtxkelc said:
That's a neat way of being consistent, but it doesn't produce a 45 degree chamfer. The plane is at 45 degrees before you take the first stroke, but with each stroke you take away your reference and the angle reduces. (/pedant mode).

Good point - so I need to reduce the distance to the edge by the depth of the chamfer to get it spot on.

Thanks

No! If you do that from the start you will end up with a deeper chamfer by the time you get to 45 deg (I think...).

Technically what you need to do is move the workpiece towards the reference edge by the thickness of a shaving after every pass.

Obviously you're not going to do that so I'd just go by eye like in the olden days. Bit of practice/muscle memory and you'll have them right every time.
 
IMG_2808.JPG

This afternoon I have put chamfers on my tapered Garden Table legs using the 'by eye' method, 10 passes per chamfer. They look OK, maybe not a dead 45 degrees but close enough.
Thinking about it, Robert's method wouldn't work on a chamfer-on-a-taper situation.
John
 
droogs":5yk4grv4 said:
I just run lines down the sides 3mm from the edge and plane to them
:text-+1: Although 3mm is a lot. I am usually no more than 2mm
Can I ask Robert, why it needs to be that accurate? I am intrigued to know. For me usually if it looks right it is right.
 
AJB Temple":2o4wcib9 said:
Trim routers were invented for a reason. Just sayin'.
Apart from a couple of strokes of the block plane is faster, quieter and far more satisfying.
 
TrimTheKing":38eghdzw said:
No! If you do that from the start you will end up with a deeper chamfer by the time you get to 45 deg (I think...).

Technically what you need to do is move the workpiece towards the reference edge by the thickness of a shaving after every pass.

Obviously you're not going to do that so I'd just go by eye like in the olden days. Bit of practice/muscle memory and you'll have them right every time.

No, my amended method is right Mark. The angle starts steeper and gradually drops to 45 degrees. I had a cancelled meeting earlier and rather than clear e-mails I went and checked it :lol:

PAC1":38eghdzw said:
Can I ask Robert, why it needs to be that accurate? I am intrigued to know. For me usually if it looks right it is right.

The actual angle being accurate on 45 degrees probably doesn't matter but the consistency on a box that is supposed to look as near to perfect as possible is definitely key. I seem to be in a cycle of being asked to make a box because someone has seen one I made so there's a bit of self inflicted pressure to keep upping the standard.

AJB Temple":38eghdzw said:
Trim routers were invented for a reason. Just sayin'.

Defeats the point though if as a hobby you want to be able to do it accurately with hand tools!
 
johnward":w0lp0nk8 said:


This afternoon I have put chamfers on my tapered Garden Table legs using the 'by eye' method, 10 passes per chamfer. They look OK, maybe not a dead 45 degrees but close enough.
Thinking about it, Robert's method wouldn't work on a chamfer-on-a-taper situation.
John

This is making my head hurt a bit John but I think it would if you measure the thickness as both ends and distance accordingly from the edge (so the thinner end is closer to the edge than the thicker one). Looks like you've done a good job without it though!

Cheers

Robert
 
I agree really Peter. Oddly enough I have a little wooden plane with a V groove down the length of the sole, which is designed to do shallow chamfers. Very useful little tool.
 
Matt Estlea demonstrated using a marking gauge which I hadn't seen done before.
The idea of planing to the line, be it knife or pencil, seems like the most sensible approach for someone wanting to use a smoother, and not something else.
 
TomTrees":wcu2n8ed said:
Matt Estlea demonstrated using a marking gauge which I hadn't seen done before.
The idea of planing to the line, be it knife or pencil, seems like the most sensible approach for someone wanting to use a smoother, and not something else.

How did that work then? Or was it a pencil gauge? A marking gauge would leave a cut line below the finished surface of the chamfer. I suppose you could carry planing on until the lines disappear but you'd end up with a chamfer wider than you had marked.
 
Matt used a wheel gauge, so I suppose he marked them very lightly.
I reckon he wouldn't have suggested the idea if it didn't work well for his style work+close up filming .
Tom
 
AndyT":8m8hn65s said:
TomTrees":8m8hn65s said:
Matt Estlea demonstrated using a marking gauge which I hadn't seen done before.
The idea of planing to the line, be it knife or pencil, seems like the most sensible approach for someone wanting to use a smoother, and not something else.

How did that work then? Or was it a pencil gauge? A marking gauge would leave a cut line below the finished surface of the chamfer. I suppose you could carry planing on until the lines disappear but you'd end up with a chamfer wider than you had marked.

I don't think I've seen that video, but I guess it depends partly on whether you care about accuracy or just consistency. If you mark all the chamfers with a marking gauge, they'll probably all end up the same, even if they're a bit wider than the marked size.
 
PAC1":15hv9t8j said:
droogs":15hv9t8j said:
I just run lines down the sides 3mm from the edge and plane to them
:text-+1: Although 3mm is a lot. I am usually no more than 2mm
Can I ask Robert, why it needs to be that accurate? I am intrigued to know. For me usually if it looks right it is right.
No need I fancy, for extreme accuracy with a decorative chamfer; 2mm is fine and if, as mentioned, it looks right then it is right.

TomTrees":15hv9t8j said:
Matt used a wheel gauge, so I suppose he marked them very lightly.
I reckon he wouldn't have suggested the idea if it didn't work well for his style work+close up filming .
Tom

Never, ever use a gauge of any sort to mark out a chamfer as it's almost impossible to remove the gauge lines completely. Estlea's not a bad lad, but he's wrong on this one.

AJB Temple":15hv9t8j said:
Trim routers were invented for a reason. Just sayin'.

Agreed; easy peasy to do a really accurate mitre if require. You can also use the trim router for a small roundover which can also look very effective - Rob
 
Thanks for the warning!
Pencil gauge it is for sure!
Seems I may need to take a chunk out my gauge block.

Tried to find that particular video to see how lightly the gauge was being used,
but cannot seem to find it.
See another marking gauge video of his, but the long grain bevel isn't there.
Perhaps it was someone else who suggested it.


Cheers
Tom
 
TomTrees":27omd4qy said:
Pencil gauge it is for sure!
Seems I may need to take a chunk out my gauge block.

Tom
You don't even need to do that Tom. Get hold of a small bit of angle somat (offcut of a picture frame say) and file a 'V' notch in it so that the bottom of the 'V' is 2mm or so from the internal corner. Drop a sharp pencil into the notch and run it along the edge, both sides to mark out the chamfer. Job done :D

Worth noting as well that most pencil gauges won't size down to 2mm 'cos of the pencil thickness - Rob
 
As an apprentice I was taught to mark parallel lines using my middle finger as the gauge for any pencil line upto about 30mm from the edge. It has saved many hours and is surprisingly accurate.
 
PAC1":2u5r7uuh said:
As an apprentice I was taught to mark parallel lines using my middle finger as the gauge for any pencil line upto about 30mm from the edge. It has saved many hours and is surprisingly accurate.

The "finger gauge", as my O-level woodwork teacher called it.
 
Back
Top