• Hi all and welcome to TheWoodHaven2 brought into the 21st Century, kicking and screaming! We all have Alasdair to thank for the vast bulk of the heavy lifting to get us here, no more so than me because he's taken away a huge burden of responsibility from my shoulders and brought us to this new shiny home, with all your previous content (hopefully) still intact! Please peruse and feed back. There is still plenty to do, like changing the colour scheme, adding the banner graphic, tweaking the odd setting here and there so I have added a new thread in the 'Technical Issues, Bugs and Feature Requests' forum for you to add any issues you find, any missing settings or just anything you'd like to see added/removed from the feature set that Xenforo offers. We will get to everything over the coming weeks so please be patient, but add anything at all to the thread I mention above and we promise to get to them over the next few days/weeks/months. In the meantime, please enjoy!

Has anybody ever made an ironing board?

Andy Kev.

Nordic Pine
Joined
Jan 4, 2021
Messages
722
Reaction score
59
I have to buy an ironing board in the next couple of days. It occurred to me that most of them are hardly built to last and that a medium term project would be to build one. There is, however, the obvious stumbling block: the padded bit that shirts etc have to lie on.

That led me to the question of if anybody has made one, how did you approach that? It's obviously an entirely different skill set than woodworking, so do you have to go to an upholsterer or similar (I have no wish to learn how to use needle and thread).
 
That sounds fairly straightforward but before I go into full Google mode, are there any that consist of a bit more than a bit of thin foam covered by a bit of cloth?

I ask because it would be a shame to make a hand built board finished off with mass produced tat.
 
Her majesty has just bought a new one, it’s wider than previous ones, seems to be very robust.
It was £55 but she is really pleased with it, she says ironing is much easier.
Never seen her so pleased with a kitchen appliance before.
 
StevieB":331rs3xz said:
Buy an ironing board cover from any home type store......

Apparently…….. there’s more to it than the cover, the underlying material needs to reflect the heat back.
 
When I was in the Army 20+ years ago the JML ironing board cover was the one to have. Not sure if they still do them but now I'm back to ironing shirts I might have a look.
If you do end up making your own some industrial tinfoil under a JML cover should be just the ticket.

** edit to add: Turns out they do still do them so I have just ordered.https://www.amazon.co.uk/JML-FastFit-Re ... 4048&psc=1
 
Back in the 60s, we used to make wooden ironing boards in the upstairs rooms of LePages Woodware in Greenford. I'm sure the the padding and cover were all cotton or cotton based.
 
In these days of steam irons, I would think an impermeable layer between anything wood and the ironing might be wise. Hot steam and wood are not conducive to wood staying flat, or intact.
 
Agree on the steam thing, I don’t imagine a solid wood board of good quality will stay flat for long using a steam iron. My board is perforated metal sheet for that very reason.
 
Buy an ironing board. If its fifty quid and lasts four years thats 12.50 a year.
If it lasts for ten thats a fiver a year
A wooden one will be twice the cost, three times the weight and four times the hassle.
Find something more useful to do with your time and your wood. :lol: 8-)
 
The ironing board we had as kids was a wooden one that my dad made. It was heavy and awkward, as I recall, but it had a sleeve thingy on it, which I've never seen since.
When I set up on my own I bought a Beldray 5*. I left it behind when life when pear-shaped, which I regret. Yes it was 30 years old by then, but it was superb quality, a fact I didn't appreciate until I came to buy a replacement. There is some utter rubbish out there.
I now have a Lidadli one and it's very good indeed (not that I have much use for it these days).
 
Thanks for all the thoughts and suggestions, especially to blackswanwood and firedfromthecircus for the links.

I'm going to have to buy a normal board as a quick fix but I shall look into making a wooden one later.
 
Sorry for the slow reply but I have been away.

About 40 years ago I bought my first ironing board, from a jumble sale. It was wooden, commercially made and sturdy. The rest for the hot iron was probably asbestos cement but a modern silicate board could be used instead. A bit of cotton wadding and a replacement cover.

The height adjustment was neat - a piece of chain went through a thin metal slot so you could hook it in at the right length, varying the leg angle and thus the height. It was the sort of chain you could get at any plumber's merchant back then...

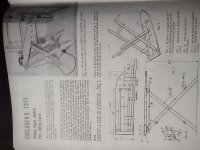
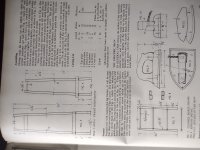
I thought I might have had some instructions for one somewhere but the best I can find is these diagrams for a toy one that you could scale up perhaps.

IMG_20210918_183919952.jpg

IMG_20210918_183937487.jpg
 
When we moved in here there was a wooden ironing board, obviously home made, built into a cupboard. It was hinged at the non-pointed end so it could be folded away when not in use. I still have it - I rarely throw away wood and I might use it for something, sometime.
 
Just4fun":38d0s6lp said:
When we moved in here there was a wooden ironing board, obviously home made, built into a cupboard. It was hinged at the non-pointed end so it could be folded away when not in use. I still have it - I rarely throw away wood and I might use it for something, sometime.

My grandmother and aunt lived in a ground floor flat in one of the 'houses' on the Tachbrook Estate in Pimlico. Every kitchen had a fold away ironing board inside the door of one of the kitchen cupboards.

https://manchesterhistory.net/architecture/1930/tachbrook.html
 
Looking at the diagrams a bit closer, I've remembered that the moving leg, rather than just sliding under board "H" had its dowel axle overlong, with the ends running in stopped grooves in a pair of battens fixed by their edges to the underside of the main board. The front, sliding leg had the bog chain on it, running through a metal slot under the back end.
 
This ironing malarkey, what is it? I think the last time I ironed a shirt was when I used to go down AxHQ, so that was two shirts a month that needed some attention - Rob

Edit - l do remember my dad knocked one up when I was very small, but I can’t recollect what became of it. This was in the mid-50’s so household items may have been a bit hard to get hold of, especially on Malta which is where we were living at the time, dad being RN which still a huge presence on the island.
 
Andy T: thanks for those plans. They make a useful starting point for thinking about design.

For those of you who remember wooden ironing boards: was the main board on which the ironing was actually done also made of wood? I ask because of the above mentions of the chance of the wood warping.
 
The main part of mine was plywood. Even though it was probably from the 50s it had held up pretty well. When I eventually took it to bits, the glue had not been affected much by the heat and steam.
 
Mine looks to be pine and has 1/4 inch hard felt glued on. This glue possibly forms a barrier to any steam related warping.
However this is for domestic ironing and not a shooting board or similar and does not need to be precisely flat.

Bob
 
9fingers":1iix0bm8 said:
However this is for domestic ironing and not a shooting board or similar and does not need to be precisely flat.

Bob

But hang on a sec... What about a combined shooting and ironing board...get your collars as flat as your boards...get perfectly matched creases down the legs of your overalls... Every home should have one! :)
 
What angle do I need to hone my iron to in order to get decent cuffs?
Should I microbevel it?
Do I need a jig?
Am I best using denatured water for the steam?
 
9fingers":1gik2fgx said:
Mine looks to be pine and has 1/4 inch hard felt glued on. This glue possibly forms a barrier to any steam related warping.
However this is for domestic ironing and not a shooting board or similar and does not need to be precisely flat.

Bob
I do like the idea of the hard felt. It's probably the solution.
 
AndyT":255ybk3r said:
9fingers":255ybk3r said:
However this is for domestic ironing and not a shooting board or similar and does not need to be precisely flat.

Bob

But hang on a sec... What about a combined shooting and ironing board...get your collars as flat as your boards...get perfectly matched creases down the legs of your overalls... Every home should have one! :)
... which is all well and good until in a fit of absent-mindedness you shoot your collars. I don't think they would survive too many contacts with a No 5.
 
I'm struggling to see how to fit a heating element into a #5 to produce a combination clothes iron & wood plane. One major difficulty is the ambiguity when referring to "the iron".
 
Just4fun":1dbn6sem said:
I'm struggling to see how to fit a heating element into a #5 to produce a combination clothes iron & wood plane. One major difficulty is the ambiguity when referring to "the iron".
I think you may have hit on something there!

Just imagine how mock-artisanal hipster types would snap up modified electric No 5s - or even better No 8s with corrugated soles - to do their ironing.

No 1s would be exclusively for shirt collars.
 
Smoothing irons existed well before electrickery. Just chuck your #5 on the fire for 20 mins. It will then be hot enough to smooth even the most creased shirt.
 
Andyp":1maeoaiu said:
Smoothing irons existed well before electrickery. Just chuck your #5 on the fire for 20 mins. It will then be hot enough to smooth even the most creased shirt.

Andy was using a plane on his shirts before it was cool. :)
 
Andyp":22gvhy5f said:
Collars and cuffs only at this time of year. ;)

do they match though? as I've gotten older I've found the cuffs of my once pristine sleeves are turning a bit grey at the edges. :o
 
To be honest I should have said collars only. I always roll up my sleeves and pull up any jumpers above the elbow.
 
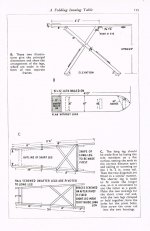
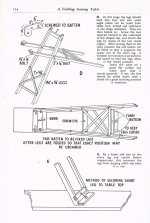
Here you go Andy. Sorry to be so slow but I've now found the instructions for a full size one. This is from "The Home Workshop" published by Odhams Press. There's no date in the book but the BL catalogue gives 1939, which sounds about right from the chapter on Air Raid Precautions which shows how to seal a room against gas attack. On a lighter note, it also has pictures of how to dress properly when squinting at a piece of wood... ;)

ironingboard1.jpg

ironingboard2.jpg

ironingboard3.jpg
 
AndyT":13k8nyga said:
Here you go Andy. Sorry to be so slow but I've now found the instructions for a full size one. This is from "The Home Workshop" published by Odhams Press. There's no date in the book but the BL catalogue gives 1939, which sounds about right from the chapter on Air Raid Precautions which shows how to seal a room against gas attack. On a lighter note, it also has pictures of how to dress properly when squinting at a piece of wood... ;)

View attachment 2

View attachment 1


Perhaps skip the asbestos iron stand...
 
Back
Top