
Routermonster
New Shoots
Hi Everyone
I’m following up on Russell’s recent post about the suitability of this fence for a Metabo bandsaw. I don’t want to hijack the thread, so I thought I would submit a separate post.
I have owned my Record BS350 for about 12 years. I have never been completely satisfied with the fence (or the bearings - but that’s another story), and so last autumn I decided to invest in a Kreg Precision Bandsaw Fence.
I was attracted by the advertising that stated that it would fit most 14” bandsaws. It did so - after some modifications.
The spacing of the vertical slots on the fence rail did not match the existing bolt holes on the table edge. Initially I thought I would modify a couple of these slots, but I then realised that I would still need to drill at least two new holes in the rail, and even then, the one on the right hand side would not allow the rail to line up with the corner of the table. As I did not want to drill additional holes in the cast iron table, I ‘bit the bullet’, and modified the rail by drilling four 8 mm diameter holes at the required spacings.
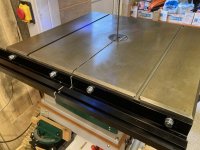
I secured the fence rail using 25 mm long M8 hex-headed bolts, fed from behind the table edge, together with flat/penny washers, a pressure washer and nut. Because the holes in the table were rather large (11 mm diameter), I made up little sleeves using aluminium foil; these I slipped over the bolts to reduce ‘wiggle room’.
I offered up the pre-drilled fence rail to the table and temporarily bolted it in place. I carefully marked out the position of the blade slot, removed the rail, and then cut it on the bandsaw, using a M42 blade. I filed smooth the cut edges, and reassembled the rail, carefully lining up both halves, and ending up with a gap of about 1.5 mm. This gap still allows the fence bracket to be slid along, without an excessive ‘bump’ when it rides over the gap.
I have made a small stop using a scrap of oak. This is intended to be used when cutting tenons on the bandsaw. It is stored behind the fence when not in use.
To conclude, I am pleased with this fence. It is easy to adjust, accurate, solid when locked down, and can be removed without any fuss. The slots on the extrusion will be useful in future. It is an improvement over the original one.
Hope this is of use.
Les

I’m following up on Russell’s recent post about the suitability of this fence for a Metabo bandsaw. I don’t want to hijack the thread, so I thought I would submit a separate post.
I have owned my Record BS350 for about 12 years. I have never been completely satisfied with the fence (or the bearings - but that’s another story), and so last autumn I decided to invest in a Kreg Precision Bandsaw Fence.
I was attracted by the advertising that stated that it would fit most 14” bandsaws. It did so - after some modifications.
The spacing of the vertical slots on the fence rail did not match the existing bolt holes on the table edge. Initially I thought I would modify a couple of these slots, but I then realised that I would still need to drill at least two new holes in the rail, and even then, the one on the right hand side would not allow the rail to line up with the corner of the table. As I did not want to drill additional holes in the cast iron table, I ‘bit the bullet’, and modified the rail by drilling four 8 mm diameter holes at the required spacings.
I secured the fence rail using 25 mm long M8 hex-headed bolts, fed from behind the table edge, together with flat/penny washers, a pressure washer and nut. Because the holes in the table were rather large (11 mm diameter), I made up little sleeves using aluminium foil; these I slipped over the bolts to reduce ‘wiggle room’.
I offered up the pre-drilled fence rail to the table and temporarily bolted it in place. I carefully marked out the position of the blade slot, removed the rail, and then cut it on the bandsaw, using a M42 blade. I filed smooth the cut edges, and reassembled the rail, carefully lining up both halves, and ending up with a gap of about 1.5 mm. This gap still allows the fence bracket to be slid along, without an excessive ‘bump’ when it rides over the gap.
I have made a small stop using a scrap of oak. This is intended to be used when cutting tenons on the bandsaw. It is stored behind the fence when not in use.
To conclude, I am pleased with this fence. It is easy to adjust, accurate, solid when locked down, and can be removed without any fuss. The slots on the extrusion will be useful in future. It is an improvement over the original one.
Hope this is of use.
Les
