• Hi all and welcome to TheWoodHaven2 brought into the 21st Century, kicking and screaming! We all have Alasdair to thank for the vast bulk of the heavy lifting to get us here, no more so than me because he's taken away a huge burden of responsibility from my shoulders and brought us to this new shiny home, with all your previous content (hopefully) still intact! Please peruse and feed back. There is still plenty to do, like changing the colour scheme, adding the banner graphic, tweaking the odd setting here and there so I have added a new thread in the 'Technical Issues, Bugs and Feature Requests' forum for you to add any issues you find, any missing settings or just anything you'd like to see added/removed from the feature set that Xenforo offers. We will get to everything over the coming weeks so please be patient, but add anything at all to the thread I mention above and we promise to get to them over the next few days/weeks/months. In the meantime, please enjoy!

Splines

Alder

New Shoots
Joined
Aug 14, 2018
Messages
57
Reaction score
0
Location
Mid Pembrokeshire
How much additional strength do splines give a glued mitre joint?
Much to my surprise I today successfully glued a spline into a saw blade cut on a mitre joint.
Russell
 
I can’t give a scientifically backed answer but I’d imagine quite a lot tbh. You’re effectively sticking an opposing grained (or it should be) piece of wood into a joint so it will act like a strong brace against pulling forces.

I’d expect a splined mitre joint to take a huge amount more force to break it than a non-splined joint.
 
Mark mentioned the key (hah!) to a splines strength. Grain direction. make sure the splines grain is 90 degrees to the frame. if you arent aware of orientation and make the splines grain in line with the joint, then theres very little extra strength.
you can snap a spline easily by hand if the break is along the grain, No chance if its across the grain.
 
I was doing just that yesterday. I like to put my splines on the face of the joint rather than the edge. Once I've cleaned them up I’ll post images. Nothing grand just a couple of trivets.
 
Here is mirror frame I made a few years back with face side splines.

spline detail.jpeg

ready for oil.jpeg

I am not so sure if these give quite so much added strength than the more conventional edge on splines but I like the effect.
 
I have put splines on the back with a biscuit jointer in the past, but that requires home-made biscuits, as normal biscuits have the predominant grain running the wrong way to be useful (and obviously you only get half the normal biscuit width).

I think they probably help, but next time I'll probably use cut-down 6mm dominoes in the mitre faces as I now have a machine. 6mm is overkill, but mine is the bigger domino and can't do smaller ones (it can't officially do 6mm either, but that's another story).

Given most of the frames I've done have a fairly rigid back, the purpose is really only to stop twist at the mitres, rather than hold them together,
 
Andy, do you put those on the reverse as well? They look really good but arent all that deep. If theyre not on the back as well I dont think they would add much to joint strength.
I use the table saw sled to make the cut (2.8mm) then use a thin rip jig to cut the 2.8 mm slice. My only problem is I dont have a flat toothed blade, so the inner end of the cut is a tiny bit ragged.
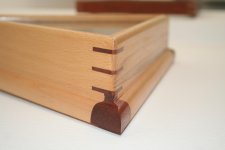
This is my fanciest spline, on the corner of a triangular frame. Beech with bubinga accents

IMG_3519.JPG
 
Here's a rather involved but precise method by hand in an old video by Simon James.

https://www.youtube.com/watch?v=JX3zFOxYy1M

He starts off showing a 'Dutchman' at the rear..... but goes on to a flat spline.

He's doing it for a straight mitre-joint, but it can be adapted for a picture-frame with the addition of glass-rebates.

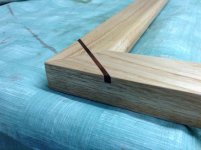
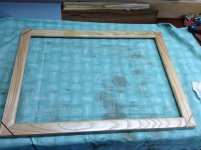
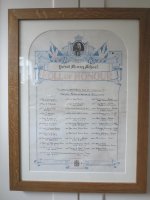
This one was done using that method for a local village when they discovered a WW 1 volunteer list folded up in a drawer.

As the mitred corners here are a face-to-face junction it requires dead square and flat faces and all the markings from a face edge. The wood was very dry, quarter-sawn Oak.

Using that method, the splines that I have done here rely on at least 3/4" width (3/8" each side), though it would be more for heavier, glazed frames.
The splines are cut across the grain so that the grain runs at right-angles to the mitre-face when it's assembled, as has already been mentioned.
It's a challenge to do..... and takes some time, but gives a very strong joint.

Another, similar method is to cut a blind mortise/tenon at a 45 deg angle......


IMG_0923 - 1.JPG
 
sunnybob":h88ly6g5 said:
I use the table saw sled to make the cut (2.8mm) then use a thin rip jig to cut the 2.8 mm slice. My only problem is I dont have a flat toothed blade, so the inner end of the cut is a tiny bit ragged.
Do them on your router table like wot I do using one of these. I used to use a tablesaur years ago but (IMO) they're just not suitable for spline cutting and you do need a different sort of blade to get a flat bottomed cut - Rob
 
[/quote]
Do them on your router table like wot I do using one of these. I used to use a tablesaur years ago but (IMO) they're just not suitable for spline cutting and you do need a different sort of blade to get a flat bottomed cut - Rob[/quote]
How bizarre, I have a full set of those up to 10 mm and never ever thought of cutting a spline with them.
But what kind of sled do you use to keep the mitre square to the cutter?
 
I made an attachment for my biscuit joiner that screws to the fence it’s a couple of bits of 6mm mdf one with a V shaped 90deg notch in to locate the corner it seems to work well.


Pete
 
sunnybob":eucas8nd said:
But what kind of sled do you use to keep the mitre square to the cutter?
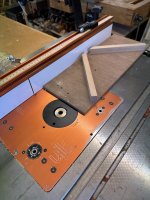
Easy peasy SB:

IMG_1019.jpeg

A gash bit of ply and two bits of pine screwed on at exactly 45deg each to the face that bears against the router fence. Works a veritable treat and I've used it for yonks - Rob
 
My initial question was aimed at establishing the integrity of the mitre joint by using splines. Some of the replies whilst visually attractive present more as cosmetic than consolidating the integrity or have i not understood the answers.
Russell
 
Alder":24zjnmx8 said:
My initial question was aimed at establishing the integrity of the mitre joint by using splines. Some of the replies whilst visually attractive present more as cosmetic than consolidating the integrity or have i not understood the answers.
Russell
Any spline will strengthen the mitre more than not having one.

Andy’s picture will strengthen albeit only on one face, but Sunnybob’s first pic shows the more ‘traditional’ way of adding splines which will absolutely strengthen the mitre with three splines working in conjunction with glue.

Was there something more specific you were looking for in an answer?
 
Sorry if I’ve muddied the waters for you Russell, welcome to WH2 by the way.

Although my face splines would not be as strong as edge on ones I am sure that they still had strength to an otherwise near end grain joint and yes they are, perhaps, more aesthetic too.
They are not many forces on a picture frame trying to pull the joints apart, just wood movement and perhaps gravity. On a drawer carcass for example where the front is constantly trying to be pulled from the sides conventional splines would be much stronger.

What are you making?
 
Alder":2nnckqvc said:
My initial question was aimed at establishing the integrity of the mitre joint by using splines. Some of the replies whilst visually attractive present more as cosmetic than consolidating the integrity or have i not understood the answers.
Russell

I thought my first answer (post three) explained the importance of grain direction of the spline in relation to added strength fairly clearly?

Woodbloke, I have the same fence! :lol: I shall use that method in the future, thanls.
 
Firstly an apology to Sunnybob, your answer was a proper reply to my query. Subsequent replies moved onto more mechanical means and whilst they are way above my pay grade I was merely trying to get a better understanding of these methods.
Russell
 
Topic creep is a way of life of all forum discussions, sometimes the creep turns into a 100 yard dash, with a bit of show and tell added in. :lol: :lol: 8-) 8-)
 
Alder":19zcj888 said:
How much additional strength do splines give a glued mitre joint?
Much to my surprise I today successfully glued a spline into a saw blade cut on a mitre joint.
Russell

There is a great deal of Old Wives Tales controlling the way we treat mitre joints. The major assumption is that end grain to end grain joints are weak. The reasoning behind this is that end grain “straws” suck up the glue and the joint become glue starved. Well, the answer for this is to “size” the mitre faces.

There was a recent video by Patrick Sullivan, which was an assessment of the strength of end grain glueing ...

https://www.youtube.com/watch?v=m7HxBa9 ... ckSullivan

There were some incorrect conclusions drawn, but the main take away here is how strong modern glues are.

Then Rob Cosman, following release of Patrick's video, did his own testing ...

https://www.youtube.com/watch?v=l_w_or3 ... Cosman.com

Go to the 25-minute mark where a 200 lb Rob Cosman jumps on a dovetailed-and-glued corner and a end grain-glued corner. Both survive. Again, glue wins.

Over the years I have completed many boxes and some cases without spline reinforcements, and they have held up just fine.

The cases are simply mitred to avoid anything distracting the visual flow of the wood grain and figure.

PowerHandTogether2_html_m4c26b32d.jpg


I chose to glue these up without any reinforcements. Instead, the panels were taped together ...

PowerHandTogether2_html_7734097f.jpg


and glued with a sizing technique ...

PowerHandTogether2_html_b7346e3.jpg


Note that the wood was carefully chosen: quartersawn Tasmanian Oak. Nice straight grain. Waterfall construction, which meant that grain matched grain.

Regards from Perth

Derek
 
That’s very interesting Derek, thank you. Another school day.

I have only ever thought about sizing when preparing walls for papering. I have never before heard of sizing wood before gluing. Makes perfect sense. I have read about a 50/50 mix, glue to water. Is that what you use?
 
Andy, most references say ‘thin the glue’. What I do is spread unthinned glue, and rub it in with a finger, and leave to dry. While it is tacky, add more glue and push the parts together.

Incidentally, the packing tape I used in the photo is fantastic. It locks the parts together securely and prevents glue squeezing out. Some woods may experience a little grain fibre pulling when it is removed. This has been minimal in my experience.

Regards from Perth

Derek
 
Back
Top