

Norty Raskel
New Shoots
After what seemed like an eternity I finished painting the separate components and the lantern was finally ready to be permanently rebuilt on the roof.
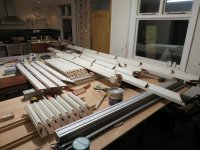
I had measured for the glass before disassembly and placed the order the week before, so on the Friday afternoon I took off from work to collect the glass spurred on by the thought of the roof being water tight by the end of the weekend. Ha!!
I really should know better by now, pretty much everything on the build has taken longer than I had envisaged so at the end of the weekend this is as far as I had got.
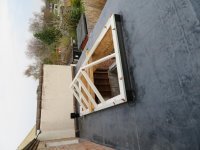
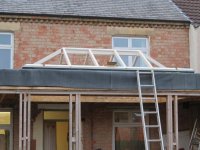
The sill is fixed and sealed with the main rafters and ridge secure, but still requires the hip and jack rafters and nowhere near needing the glass yet.
I then had a week of long hours at work so no more progress during the week, but I have the Easter week booked off so there was no need to rush it.
So now we're up to the weekend just passed, time to fit the hip/jack rafters, but now these are too tight, they were a tight fit dry fitted on the bench and the thickness of the paint plus some very slight changes in alignment meant they would now longer fit, so back and forth, up and down the ladder I went sanding down the sides of the rafter until they were a snug fit between the closers.
During assembly I had used cascamite, partly because I wanted the longer open time and partly I wanted cascamite gap filling properties to aid air tightness (incidentally the first weekend the temperature was 7degC and the excess cascamite hadn't set the next day, the following weekend it was over 20degC and the glue was beginning to stiffen as I was using it).
This is where I got to at the end of the second weekend, frame work all complete.

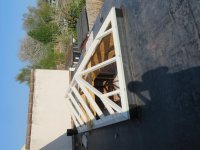
I really like how the detailing has worked out from below
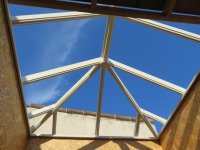
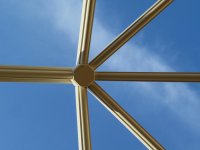
I have noticed some very small glints of light coming through between some of the rafters and the closers, the fit being not as tight as I would have wanted so I will need to go round with some sealer/filler at some point.
Monday I spent stapling on the rubber gaskets, no photos I'm afraid, I got carried away and finished in poor light.
So Tuesday brings the big day, glazing day. I had laid awake at night wondering how I would go about this. I needed to get two panes in place before I could get the first cap in place to pin them in position. I was hoping the gaskets would be enough to hold the first pane in place whilst I fitted the second but as soon as it was placed in position it started to slide down. After much head scratching I decided to use a flooring clamp (effectively a ratchet strap with a L shaped plate at each end) to hook over the far side of the lantern, over the ridge and then hooked over the bottom of the pane to hold it in place.
There are no photos during the fitting phase because I don't think I ever been so nervous on a job before, a combination of heavy expensive glass and what now looked like a very big hole down to the ground...........
Anyway, once those first to units went in, I found more of a process as the job went on aided by the ever increasing area to lean against.
After a long tiring day, I got to here

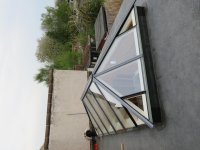
Rather annoyingly, the little triangles between the hip and the jack, were made wrong, so I wasn't able to get it fully watertight that evening. I checked my drawing which was correct (although maybe sightly ambiguous) which was a relief and the supplier has accepted responsibility and will get some more made up for the end of this week.
Once they're fitted, I just need to finish off the capping to hide the screws and fit the finials before I can sign it off as complete :eusa-dance:
Incidentally, if anyone was interested the double glazing spec was 24mm, 4mm Pilkington K-edge, 16mm warm edge spacer, 4mm toughened clear glass, argon filled, giving a U-value of 1.2.
I now think I need a couple of weekends gardening as things have been neglected for quite some time, before deciding on what to tack next.
I had measured for the glass before disassembly and placed the order the week before, so on the Friday afternoon I took off from work to collect the glass spurred on by the thought of the roof being water tight by the end of the weekend. Ha!!
I really should know better by now, pretty much everything on the build has taken longer than I had envisaged so at the end of the weekend this is as far as I had got.
The sill is fixed and sealed with the main rafters and ridge secure, but still requires the hip and jack rafters and nowhere near needing the glass yet.
I then had a week of long hours at work so no more progress during the week, but I have the Easter week booked off so there was no need to rush it.
So now we're up to the weekend just passed, time to fit the hip/jack rafters, but now these are too tight, they were a tight fit dry fitted on the bench and the thickness of the paint plus some very slight changes in alignment meant they would now longer fit, so back and forth, up and down the ladder I went sanding down the sides of the rafter until they were a snug fit between the closers.
During assembly I had used cascamite, partly because I wanted the longer open time and partly I wanted cascamite gap filling properties to aid air tightness (incidentally the first weekend the temperature was 7degC and the excess cascamite hadn't set the next day, the following weekend it was over 20degC and the glue was beginning to stiffen as I was using it).
This is where I got to at the end of the second weekend, frame work all complete.
I really like how the detailing has worked out from below
I have noticed some very small glints of light coming through between some of the rafters and the closers, the fit being not as tight as I would have wanted so I will need to go round with some sealer/filler at some point.
Monday I spent stapling on the rubber gaskets, no photos I'm afraid, I got carried away and finished in poor light.
So Tuesday brings the big day, glazing day. I had laid awake at night wondering how I would go about this. I needed to get two panes in place before I could get the first cap in place to pin them in position. I was hoping the gaskets would be enough to hold the first pane in place whilst I fitted the second but as soon as it was placed in position it started to slide down. After much head scratching I decided to use a flooring clamp (effectively a ratchet strap with a L shaped plate at each end) to hook over the far side of the lantern, over the ridge and then hooked over the bottom of the pane to hold it in place.
There are no photos during the fitting phase because I don't think I ever been so nervous on a job before, a combination of heavy expensive glass and what now looked like a very big hole down to the ground...........
Anyway, once those first to units went in, I found more of a process as the job went on aided by the ever increasing area to lean against.
After a long tiring day, I got to here
Rather annoyingly, the little triangles between the hip and the jack, were made wrong, so I wasn't able to get it fully watertight that evening. I checked my drawing which was correct (although maybe sightly ambiguous) which was a relief and the supplier has accepted responsibility and will get some more made up for the end of this week.
Once they're fitted, I just need to finish off the capping to hide the screws and fit the finials before I can sign it off as complete :eusa-dance:
Incidentally, if anyone was interested the double glazing spec was 24mm, 4mm Pilkington K-edge, 16mm warm edge spacer, 4mm toughened clear glass, argon filled, giving a U-value of 1.2.
I now think I need a couple of weekends gardening as things have been neglected for quite some time, before deciding on what to tack next.

 bscene-drinkingcheers:

