
-
Hi all and welcome to TheWoodHaven2 brought into the 21st Century, kicking and screaming! We all have Alasdair to thank for the vast bulk of the heavy lifting to get us here, no more so than me because he's taken away a huge burden of responsibility from my shoulders and brought us to this new shiny home, with all your previous content (hopefully) still intact! Please peruse and feed back. There is still plenty to do, like changing the colour scheme, adding the banner graphic, tweaking the odd setting here and there so I have added a new thread in the 'Technical Issues, Bugs and Feature Requests' forum for you to add any issues you find, any missing settings or just anything you'd like to see added/removed from the feature set that Xenforo offers. We will get to everything over the coming weeks so please be patient, but add anything at all to the thread I mention above and we promise to get to them over the next few days/weeks/months. In the meantime, please enjoy!
You are using an out of date browser. It may not display this or other websites correctly.
You should upgrade or use an alternative browser.
You should upgrade or use an alternative browser.
Staircase upgrade - ...
- Thread starter RogerS
- Start date

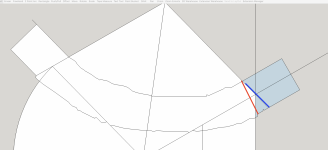
One question I have is the line to cut at each end of the wreath. Is it the line shown in blue (which I think is the correct line) or a line cut at 90 degrees to the centreline of the wreath (shown red) ?
spb
Nordic Pine
I'm fairly sure it's the blue line. Remember that the diamond shape that the wreath sits inside is a projection of the square from plan view into the inclined plane. When it's titled into position, the edges of the diamond will line up with lines square to the corner, so your cut will need to be in that line in order to meet the ends square.
Edit to add: to clarify: that blue line is in a plane that's square to the handrail in plan view, but vertical. I can't quite visualise at this point what it'll be doing when viewed from the side if you cut square through the blank on that line. Leave yourself a bit of extra room on the first cut and work it out from the trial piece.
Edit to add: to clarify: that blue line is in a plane that's square to the handrail in plan view, but vertical. I can't quite visualise at this point what it'll be doing when viewed from the side if you cut square through the blank on that line. Leave yourself a bit of extra room on the first cut and work it out from the trial piece.
David_A14
Seedling
I would have thought it was the red line Roger because the joint between the wreath (curved part) and rail (straight part) is a butt joint and therefore at 90 degrees to the straight segment of the handrail.
On another note about falling moulds, the glossary in Ellis (at the back) tells you in words what AndyT's image showed in pictures, but it then follows with a further note, which essentially says that no-one uses them anymore (in 1910 anyway). The no-one refers to experienced joiners, which you no doubt are.
David
On another note about falling moulds, the glossary in Ellis (at the back) tells you in words what AndyT's image showed in pictures, but it then follows with a further note, which essentially says that no-one uses them anymore (in 1910 anyway). The no-one refers to experienced joiners, which you no doubt are.
David
David_A14":2c7i9p9o said:.....The no-one refers to experienced joiners, which you no doubt are.
David
LOL...if only you knew !
The tangent hand-rail drawing is hopelessly out and I have no idea where the problem is. I spend the better part of yesterday working out the best way of moulding the wreath out of the blank with minimal hand tool use. Very hard. But close of play, the wreath was moulded as a first attempt using softwood and I was reasonably optimistic that this morning when I offered it up, it would be smiles all round. Huh! 
It wasn't.

Even if I go the easing route, I'm not confident that I can draw the tangent diagram for the two wreaths on either side of the easing since one end point is in space and without any reference.
All I can say is that this is such a shitty fucking cunting waste of cunting fucking bollocking time
It wasn't.
Even if I go the easing route, I'm not confident that I can draw the tangent diagram for the two wreaths on either side of the easing since one end point is in space and without any reference.
All I can say is that this is such a shitty fucking cunting waste of cunting fucking bollocking time
AndyT":2zwhg7ot said:Contradicting my own suggestion and looking in a different book, I think you need to add an "easement."
Here's a quick snap of an example from "Carpentry and Joinery (Advanced)" which shows what I think is a similar case. It gets an extra bit of rail at a steeper slope so the two runs connect.
I need to go out now but can scan the rest later if it might help.
Andy, who's the author of this book, please ?

RogerS":3ocw963b said:AndyT":3ocw963b said:Contradicting my own suggestion and looking in a different book, I think you need to add an "easement."
Here's a quick snap of an example from "Carpentry and Joinery (Advanced)" which shows what I think is a similar case. It gets an extra bit of rail at a steeper slope so the two runs connect.
I need to go out now but can scan the rest later if it might help.
Andy, who's the author of this book, please ?
Alfred and Thomas Bridgwood. Published by Newnes in 1952.
spb":3gft85h5 said:That image doesn't look like a lost cause - what's the pitch angle at each end of the wreath, compared to the straight sections, and what's the vertical distance that's missing at the join?
What do you mean by 'pitch angle'? The end of the wreath where it's joined had to be trimmed at a different angle as it was way out. As is the top one. I think, in retrospect, that the red line was the cut line and not the blue.
spb":3f1p0hmo said:That image doesn't look like a lost cause - what's the pitch angle at each end of the wreath, compared to the straight sections, and what's the vertical distance that's missing at the join?
Just been called to lunch so will measure up later. I winder if I could insert two easings...one at either end ? :eusa-think:
I think that's about right Roger, but needs a longer lead in/out at each end of the wreath.
spb
Nordic Pine
Exactly what I'm thinking of. The curve and twist you've got on that prototype look about right, but what's not lining up is the overall height and the pitch angle at the end - at least from that photo it looks as though the top of the wreath is steeper than the straight piece above it. If that was made from my last suggestion of inventing your own pitch angles to make the tangents line up, then that's to be expected, and all that's needed then is an easing piece on each side to join them nicely. Those easing pieces will also eat up some vertical height, so it looks like with those in place it'll work out.RogerS":2b5cmxp3 said:Just been called to lunch so will measure up later. I winder if I could insert two easings...one at either end ? :eusa-think:
Sounds like a plan. I also noticed that the reference point I'd chosen (arbitrary) for the ends of the two straight sections were virtual and that my pseudo-straight bit ends were not in the proper place. I'm a plonker.
So.o.o looks like it's a go'er (aka fudge). Inserted an easing piece at the bottom, didn't bother for the top as it's 'proof of concept'.

I'm going to have to watch the amount of twist as it goes along the wreath
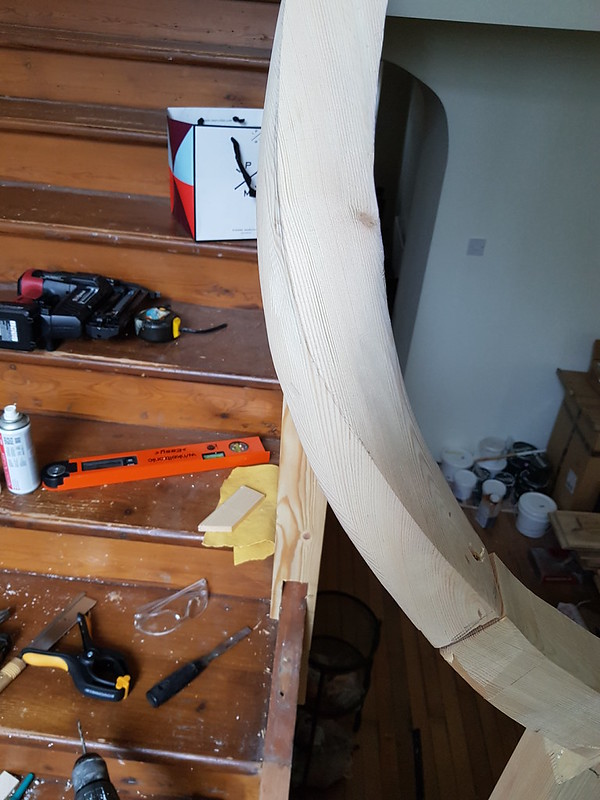
Bit clunky at the top as I mentioned but that will be fixed by an easing piece there

Would be great to do it all in one piece but I think that's pushing things TBH. Getting the angles right at the joins is going to be challenging for me because if you cut a sliver off at the wrong angle (cut in three dimensions note) the that throws things out.
I'm going to have to watch the amount of twist as it goes along the wreath
Bit clunky at the top as I mentioned but that will be fixed by an easing piece there
Would be great to do it all in one piece but I think that's pushing things TBH. Getting the angles right at the joins is going to be challenging for me because if you cut a sliver off at the wrong angle (cut in three dimensions note) the that throws things out.
SamQ aka Ah! Q!
Old Oak
:eusa-clap: RESPECT! :eusa-clap:
Sam
Sam
spb
Nordic Pine
Looks pretty spot on to me; I wouldn't call it a fudge at all. Easing pieces of that type are quite traditional (as you can see from Andy's references); while it's obviously possible in theory to do it in one piece, the layout becomes so complex as to not be worth it.
 :lol:
:lol:David_A14
Seedling
Essenmtially your latest post has given you a prototype Roger. Forget the easing, simply make the whole lot as the wreath. If the timber required to make it from a single board is unavailable (too large/expensive) divide it into two with a joint midway and secured with a handrail bolt. My own staircase (1867) incorporates a half-turn at a landing over quite a tight radius and was made in two pieces: one between the handrail from the lower flight to the midpoint on the landing and another from the midpoint of the landing to the upper flight. The rise between the two ends of the wreath is about 100mm and the radius is similar, so getting that out of a single board would have needed something near 125mm thick, and even in 1867 that seemed to be too wasteful.
David
David
David_A14":agwdjixp said:Essenmtially your latest post has given you a prototype Roger. Forget the easing, simply make the whole lot as the wreath. If the timber required to make it from a single board is unavailable (too large/expensive) divide it into two with a joint midway and secured with a handrail bolt. My own staircase (1867) incorporates a half-turn at a landing over quite a tight radius and was made in two pieces: one between the handrail from the lower flight to the midpoint on the landing and another from the midpoint of the landing to the upper flight. The rise between the two ends of the wreath is about 100mm and the radius is similar, so getting that out of a single board would have needed something near 125mm thick, and even in 1867 that seemed to be too wasteful.
David
I like the word 'simply', David. Unfortunately it isn't as simple as that because the tangent lines do not intersect - as discussed further on up. Trying to create two drawings for two wreaths that will join up properly is way beyond my capabilities.
David_A14
Seedling
RogerS":33bcmh8u said:David_A14":33bcmh8u said:Essenmtially your latest post has given you a prototype Roger. Forget the easing, simply make the whole lot as the wreath. If the timber required to make it from a single board is unavailable (too large/expensive) divide it into two with a joint midway and secured with a handrail bolt. My own staircase (1867) incorporates a half-turn at a landing over quite a tight radius and was made in two pieces: one between the handrail from the lower flight to the midpoint on the landing and another from the midpoint of the landing to the upper flight. The rise between the two ends of the wreath is about 100mm and the radius is similar, so getting that out of a single board would have needed something near 125mm thick, and even in 1867 that seemed to be too wasteful.
David
I like the word 'simply', David. Unfortunately it isn't as simple as that because the tangent lines do not intersect - as discussed further on up. Trying to create two drawings for two wreaths that will join up properly is way beyond my capabilities.
But they would intersect if you changed the pitch, which is what you've done when you put in the lower easing. Ellis specifically deals with wreaths that join handrails of two different pitches, which is what you've got. I take your point about capibilities, it would be beyond mine too, but I'd certainly like to have a crack at it. In fact if you stood on a ladder vertically above the wreath and photographed it with a scale wouldn't that give you the face mould. A similar photograph with you standing on the stairs will give you the falling mould wouldn't it. After that its plain sailing don't you think ? :text-bravo:
David
David_A14":2ztzi9zb said:RogerS":2ztzi9zb said:David_A14":2ztzi9zb said:Essenmtially your latest post has given you a prototype Roger. Forget the easing, simply make the whole lot as the wreath. If the timber required to make it from a single board is unavailable (too large/expensive) divide it into two with a joint midway and secured with a handrail bolt. My own staircase (1867) incorporates a half-turn at a landing over quite a tight radius and was made in two pieces: one between the handrail from the lower flight to the midpoint on the landing and another from the midpoint of the landing to the upper flight. The rise between the two ends of the wreath is about 100mm and the radius is similar, so getting that out of a single board would have needed something near 125mm thick, and even in 1867 that seemed to be too wasteful.
David
I like the word 'simply', David. Unfortunately it isn't as simple as that because the tangent lines do not intersect - as discussed further on up. Trying to create two drawings for two wreaths that will join up properly is way beyond my capabilities.
But they would intersect if you changed the pitch, which is what you've done when you put in the lower easing. Ellis specifically deals with wreaths that join handrails of two different pitches, which is what you've got. I take your point about capibilities, it would be beyond mine too, but I'd certainly like to have a crack at it. In fact if you stood on a ladder vertically above the wreath and photographed it with a scale wouldn't that give you the face mould. A similar photograph with you standing on the stairs will give you the falling mould wouldn't it. After that its plain sailing don't you think ? :text-bravo:
David
The pitches are the same, David. It's the way that they constructed the quarter-turn that makes it awkward.
Doug71":jgasopfg said:Looking great Roger, really enjoying watching this :eusa-clap:
I know it's one step at a time but I think getting the spindles to look right under the wreath will be another interesting one :eusa-think:
Thanks, Doug. Yes, you're on the ball there re the spindles underneath the wreath. I suspect that the spindles on the 'flat' area underneath the wreath will be the same 'urn' height (our chosen reference point') as the last spindle on the upper flight.
Well, I have one gouge coming for the top which I think is the most critical. Life move's on.
I'd like to draw your attention to this guy who's retired...over on woodwork UK. His knowledge of doing this wreath stuff is astonishing. Both he and Meccaroll have given some invaluable insights.
http://www.woodworkuk.co.uk/forum/viewt ... =9&t=14300
I'd like to draw your attention to this guy who's retired...over on woodwork UK. His knowledge of doing this wreath stuff is astonishing. Both he and Meccaroll have given some invaluable insights.
http://www.woodworkuk.co.uk/forum/viewt ... =9&t=14300
Where I went wrong with the moulding a few posts back, was not cutting the faces at either end at right angles in both directions. If you recall, I debated what angle to cut them at and I was wrong.
The other thing I sussed was that once you cut these, you don't touch them again. (Happy to be proved wrong). The next thing I sussed out was that, as you have two ends of the handrails that you are putting the wreath in between already in place (or can be temporarily while you do the wreath work) that you don't need to fuss about the bevels at this juncture either. If you've got the curve of the face mould correct and the angles of the end cuts correct then you can take some scrap softwood, cut the ends in the right place and at the correct angle and offer it up to where it is going. At this point in time you don't even need to bother with moulding the wreath. If it all looks good and fits then you can start marking the bevels on the ends.
So I used the above approach and made a block as per the drawing created in the other thread. To check it out, I also looked at the drawing to see what the final angle of the easing would be (50 degrees) and created a 'bench' easing.
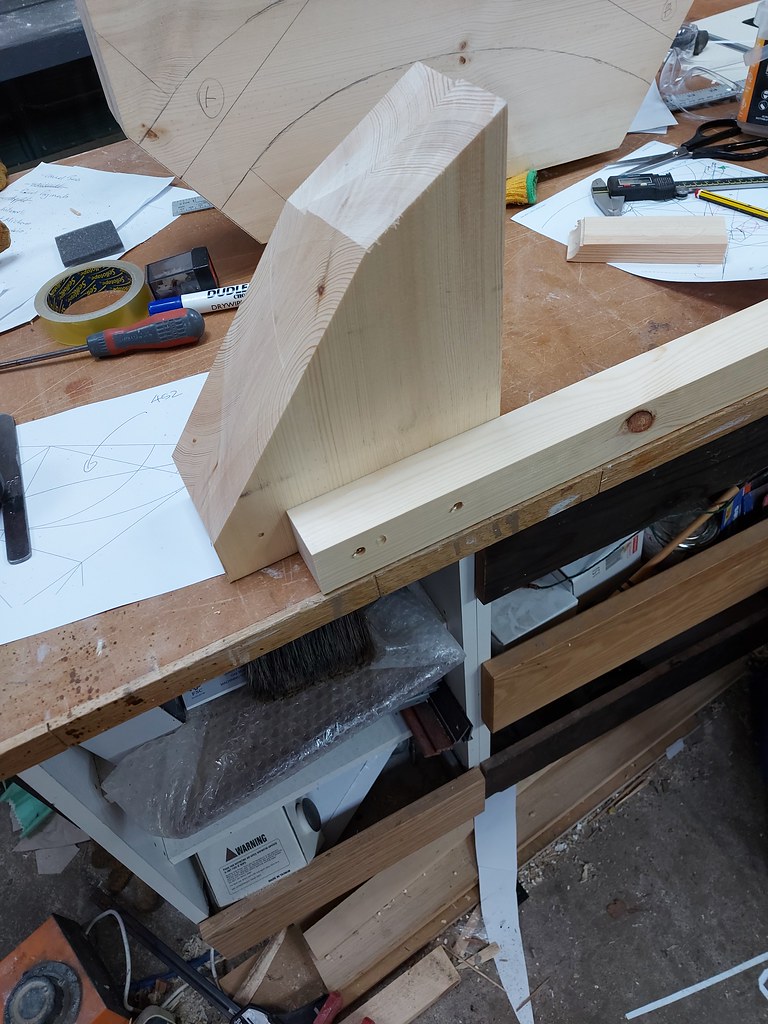
I screwed a support to correspond with the bevel angle one end and then offered up the blank.

I also created a vertical sheet of plywood as a dummy upper flight stringer pitch line and fixed it at right angles to my bench easing. I then looked to see how the fit was.
The top was perfect at 29 degrees and since the face has been cut at 90 degrees then it should match up perfectly with the end of the upper handrail.

Only it won't. There is something wrong with the drawing. The face doesn't point parallel to the upper string. It points away from it.

Now the direction it points in is dependent on the bevel line on that other end fixed to my bench easing. So I played around rotating the blank around the end of the easing to simulate different bevel angles but it proved impossible to get the other end pointing in the right direction. Definitely something wrong. So what to do?
Looking at the easing end it would flow nicely in a curve away from the easing and so it was the upper end that needed attention.
It needs extending.

And this will be the bevel line

The other thing I sussed was that once you cut these, you don't touch them again. (Happy to be proved wrong). The next thing I sussed out was that, as you have two ends of the handrails that you are putting the wreath in between already in place (or can be temporarily while you do the wreath work) that you don't need to fuss about the bevels at this juncture either. If you've got the curve of the face mould correct and the angles of the end cuts correct then you can take some scrap softwood, cut the ends in the right place and at the correct angle and offer it up to where it is going. At this point in time you don't even need to bother with moulding the wreath. If it all looks good and fits then you can start marking the bevels on the ends.
So I used the above approach and made a block as per the drawing created in the other thread. To check it out, I also looked at the drawing to see what the final angle of the easing would be (50 degrees) and created a 'bench' easing.
I screwed a support to correspond with the bevel angle one end and then offered up the blank.
I also created a vertical sheet of plywood as a dummy upper flight stringer pitch line and fixed it at right angles to my bench easing. I then looked to see how the fit was.
The top was perfect at 29 degrees and since the face has been cut at 90 degrees then it should match up perfectly with the end of the upper handrail.
Only it won't. There is something wrong with the drawing. The face doesn't point parallel to the upper string. It points away from it.
Now the direction it points in is dependent on the bevel line on that other end fixed to my bench easing. So I played around rotating the blank around the end of the easing to simulate different bevel angles but it proved impossible to get the other end pointing in the right direction. Definitely something wrong. So what to do?
Looking at the easing end it would flow nicely in a curve away from the easing and so it was the upper end that needed attention.
It needs extending.
And this will be the bevel line
Roger, I've no idea whether what you are saying makes sense - it's all too difficult for me - but I just wanted to say that I'm pleased you are making progress and are understanding this challenging stuff.
In saner times, you'd have learned it from someone who understood it, one on one, in person, at the bench. Doing it from books and online advice must be making it so much harder.
I'm glad you haven't given up.
In saner times, you'd have learned it from someone who understood it, one on one, in person, at the bench. Doing it from books and online advice must be making it so much harder.
I'm glad you haven't given up.
spb":1k0wfhrb said:Getting there.
It's hard to tell from the photos - with that extension piece, does it line up squarely with the end of the upper rail?
Yes it does. I used the laser line..hard to photograph.
Don't know if you looked at the thread on woodworkuk but it does explain how to draw for handrails that don't intersect.
spb
Nordic Pine
I looked briefly back when you first linked to it, but didn't see that explanation in detail. Will have to have another look, not that I'm planning on making one any time soon.
It looks as though that extension piece is in the same plane as the wreath block, too, in which case it's a small adjustment to cut it a bit longer, and one that could be done without starting the drawings from scratch. Does that mean the end is in sight?
It looks as though that extension piece is in the same plane as the wreath block, too, in which case it's a small adjustment to cut it a bit longer, and one that could be done without starting the drawings from scratch. Does that mean the end is in sight?
spb":2zrga610 said:I looked briefly back when you first linked to it, but didn't see that explanation in detail. Will have to have another look, not that I'm planning on making one any time soon.
It looks as though that extension piece is in the same plane as the wreath block, too, in which case it's a small adjustment to cut it a bit longer, and one that could be done without starting the drawings from scratch. Does that mean the end is in sight?
Xmas 2023. :lol:
Actually the drawing are there with the extra length and so it's a no-brainer. I'll still make up a test piece if only to get the moulding right in my head.

Malc2098
Sequoia
RogerS":lef1yoww said:OK...new approach here. At 9.45...works for me
[youtubessl]oTmOKHP9gAQ[/youtubessl]
Can I come and watch?! Sell tickets, even!

DaveL
Old Oak
So you don't need any gouges, just an angle grinder. [emoji1787]RogerS":3771onla said:OK...new approach here. At 9.45...works for me
[youtubessl]oTmOKHP9gAQ[/youtubessl]
Decision made.
After spending two weeks of my life faffing around with this bloody tangent handrailing malarkey, I dummied up two exactly dimensioned supports that provide the reference point as to where the two adjoining handrail faces will be. I can slide them up or down to adjust. I dummied up the easing piece from the drawing. Then added the wreath blank and twisted it every which way.
This is the closest I can come to.

The faces meet up flush-ish to each other but the line of the wreath is nowhere near the original lines from the drawing.
But the top joint leaves a lot to be desired.

So the approach is going to be stiffening up those two supporting columns. Make the easing - which TBH would benefit from a slight curve as well - and then adopt the Asian approach. I've got the approximate angles close enough from the softwood blank. I can see where to finesse the angles and if the face isn't at right-angles to the 'tangent' then so be it. It doesn't matter. Then when it's all glued up solid, I'll mould it in situ.
After spending two weeks of my life faffing around with this bloody tangent handrailing malarkey, I dummied up two exactly dimensioned supports that provide the reference point as to where the two adjoining handrail faces will be. I can slide them up or down to adjust. I dummied up the easing piece from the drawing. Then added the wreath blank and twisted it every which way.
This is the closest I can come to.
The faces meet up flush-ish to each other but the line of the wreath is nowhere near the original lines from the drawing.
But the top joint leaves a lot to be desired.
So the approach is going to be stiffening up those two supporting columns. Make the easing - which TBH would benefit from a slight curve as well - and then adopt the Asian approach. I've got the approximate angles close enough from the softwood blank. I can see where to finesse the angles and if the face isn't at right-angles to the 'tangent' then so be it. It doesn't matter. Then when it's all glued up solid, I'll mould it in situ.