• Hi all and welcome to TheWoodHaven2 brought into the 21st Century, kicking and screaming! We all have Alasdair to thank for the vast bulk of the heavy lifting to get us here, no more so than me because he's taken away a huge burden of responsibility from my shoulders and brought us to this new shiny home, with all your previous content (hopefully) still intact! Please peruse and feed back. There is still plenty to do, like changing the colour scheme, adding the banner graphic, tweaking the odd setting here and there so I have added a new thread in the 'Technical Issues, Bugs and Feature Requests' forum for you to add any issues you find, any missing settings or just anything you'd like to see added/removed from the feature set that Xenforo offers. We will get to everything over the coming weeks so please be patient, but add anything at all to the thread I mention above and we promise to get to them over the next few days/weeks/months. In the meantime, please enjoy!

Windsor Chairs

Custard

New Shoots
Joined
Jan 24, 2016
Messages
87
Reaction score
0
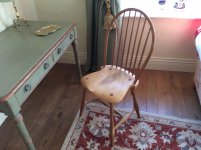
I recently mentioned that I was working on some Windsor chairs, and said I'd post a photo. I don't want to ambush another thread so I'll start a fresh one.
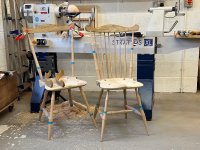
Windsor-Chairs-01.jpg

I completed one set of Windsor chairs last year and that's led to another commission of eight chairs. This time for a "harlequin set" in other words a collection of chairs with small differences in style or colour, so reminiscent of an antique set that was collected over a number of years.

Windsor chairs fall into a small but interesting woodworking category, in that they're actually a lot easier to make than you might think!

In that respect they're similar to bowl turning and box making. All three being areas where enterprising individuals offer the beginner the opportunity of a two day to two week long course, at the end of which the beginner has made a bowl, or a box, or a Windsor chair.

In a world of instant gratification that's gold dust, especially when measured against a seven year apprenticeship!

Before anyone gets offended, you can of course spend a lifetime making ever more challenging bowls, boxes, or Windsor chairs. But, almost uniquely in woodworking, it's also possible to produce a perfectly acceptable example of these, with no previous experience, and after just a few days tuition.

But there are some catches.

With Windsor chairs sourcing the timber can be problematic. Few people will be able to find freshly felled trees to cleave into blanks. And traditional English style Windsors require 16" wide boards of 2" thick Elm, good look finding those in B&Q!

Plus if you really want to make something special you'll probably want Yew for the other components. But what isn't generally realised is that it's not field grown Yew with wandering grain that you're really looking for, it's coppice grown Yew poles. Which in my experience could be fairly described as "unobtanium".

Bottom line is that your chances of a successful project are massively improved if you ensure your design fits with the real world woods that you can actually source. These Windsor side chairs for example have only one steam bent component, the crest rail (you can see two more crest rails for the next batch resting on the seat of the chair on the left). This modest radius of curvature means they can even be made from kilned timber provided it's pre-soaked and is a really good bending timber such as Ash or Oak.

I do make arm chair Windsors with more complex bends, but again I try and avoid the hassle of using green wood. I've found air dried Oak or Ash, pre soaked, delivers a reasonable percentage of successful bends, not quite the 95% plus I'd expect from green wood, but certainly 80% or better, which is good enough for me. Furthermore, there are yards where air dried Oak, Beech, and Ash are readily available. Often times recently put into stick so really pretty wet. Where I live in the New Forest I'd recommend Gouldens for this, but similar small traditional yards exist all over the country if you know where to look.

Sticking with the theme of the design and construction being guided by timber availability, you need to think hard about your seats. I first started making Windsors in the Dutch Elm disease era, there was an absolute glut of Elm. I put aside some fabulous wide, thick boards of English Elm (so not the more straight grained Wych Elm) and I've got enough left for maybe a dozen traditional English Windsors, including some long boards that deserve something really special, maybe a gothic windsor settee?
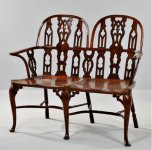
Windsor-Gothic-Settee.jpg

But back to practicalities. In my opinion the best widely available timber for Windsor seats is Poplar, or as it's sometimes called Tulipwood. But there are still two problems. First you're unlikely to find a wide enough board for a single board seat. And secondly Poplar is a nasty looking timber with streaks of greenish brown colour running through it. These two problems aren't insurmountable, you can joint a seat where the grain is matched in such a way that the join's almost invisible (spoiler alert, the best way of doing this is to source a two boards each a bit wider than half the finished seat, you rip one board down the middle, flip the pieces over and joint them to the outside of the uncut board). And the colour issue can be fixed by a two pack bleach, exposure to sunlight, fuming, or staining. However, my favoured solution is milk paint. It's bang on trend, can be co-ordinated with the client's decor, and instantly unifies disparate timbers.

Another issue that needs resolving before you begin is the tools.

Let's start with saddling the seat. You can spend an absolute fortune on this, with specialist tools like scorps, gutter adzes, and travishers. I'm not saying these don't have a role, but for the first few chairs they're not absolutely necessary. If you go on a Windsor chair making course you'll probably use these tools, and then you may well conclude that they're essential. In truth a big old out-cannel gouge and a french curve scraper will get the job done. Incidentally I say out-cannel just because it's about a thousand times easier to sharpen than in-cannel, and I'd rather have a sharp tool than the perfect tool anyday!

Then you've got the question of the spindles. Do you turn them or do you shave them? Personally I much prefer shaving or "whittling" with a drawknife and a spokeshave. I'm not the world's best turner but the only way I can turn spindles is with greenwood which cuts like butter. But then you've got the giant hassles of sourcing greenwood and of drying the spindle ends for accurate tenons. Plus I also prefer the "faceted" shape of shaved spindles, and you can make these with kilned or air dried timbers.

Incidentally, many people assume you can only rive or split out blanks from wet wood. Not true. If you select your timber in person and pick out really straight grained boards it's practical to rive spindle blanks from kilned timber. And then you can get the super thin spindles that really give a Windsor it's sprightly elegance. Furthermore, you really don't need a shave horse for this. I first learnt to make Windsors in the Mike Dunbar era, and he held his blanks in a vice rather than a shave horse, so that's what I've always done.

One final point about shaving. Personally I'd rather do the entire job with a couple of good spokeshaves rather than a bad drawknife. The problem with most used drawknives is that the backs are pitted, which makes sharpening them almost impossible. By all means do look, good used examples can occasionally be found, but be realistic. The hard fact is that most of the old drawknives on Ebay will never make an efficient or accurate tool.

I could keep banging on about this stuff for ages, but it's time for dinner, so I'll break here and pick this up later when I get a moment.

Cheers everyone!
 
Hi Custard

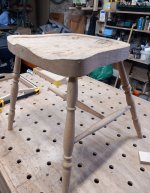
I like with a faceted spindle I made two of these stools all with hand tools.

21st March by Pete Maddex, on Flickr

You can just about make out the facets in this picture.

Stool stretchers by Pete Maddex, on Flickr
All the legs and stretchers where shaped with a draw knife and spokeshaves.
I made a scorp and taper cutter for the top of the legs and holes in the seat, I can't find a picture of the scorp at the moment, Update scorp pictures.
DSC_9116_zpsjpxt0ibb by pete maddex, on Flickr

DSC_9115_zpsmjazgg9x by pete maddex, on Flickr


Tapered ream and tenon cutter by Pete Maddex, on Flickr

So the tooling doesn't have to be expensive even if the wood is.

Pete
 
Hi Gary, and welcome back. It's been a while.

I have to say, it always cheers me when someone says "it's easier than you think". There are too many people mystifying our hobby (your profession), so it is great when someone who knows what they are talking about says "you can do that". Nice looking chairs, too.
 
Very Interesting write-up Custard. I've never, ever heard of coppice-grown Yew, whenever I picture Yew I always think of these twisting and curling branches that are of little use beyond small items. It would be interesting to see.

Mike G":f6j7o4du said:
I have to say, it always cheers me when someone says "it's easier than you think". There are too many people mystifying our hobby (your profession), so it is great when someone who knows what they are talking about says "you can do that".

I've been reading "The Stick Chair Book" by Chris Schwarz, I'd never read anything by Schwarz before and it is quite refreshing to see someone write that you don't need any super magical green elm seats, specialist tools, you don't need to rive a single thing and you can just saw it all out provided you follow straight grain, as he says, "grain is grain". People get bogged down in the super minor details but you must remember that these chairs (Stick Chairs, not Windsors as they became a massive industry) were very rarely professionally made, they were often made by farmers in the off-season as a way to pass time or generate extra income and so were made with the most basic of tools and skills, but still would last centuries, obviously the worst examples fell apart and were burned many years ago but the ones that are left are the ones that were the best.
 
Superb post. Quite inspirational actually. I have made exactly one shaped seat like that (in Elm) and it took me almost two days.
 
That settee is really something Custard, beautiful colour too. I went on one of the aforementioned 3 day courses and produced a super Windsor chair, the seat profile is very similar to yours. Re wanting the ends of the spindles dry for tenoning, on the course we split and turned from wet then put all the parts into a polythene tent overnight with a dehumidifier, the wood was almost dry the next day when we put it back on the lathe to finish to size. Agree re the faceting.
The other clever thing we learned was to size the tenons using an open ended spanner, so much easier.
I was as pleased as anything to be able to take this home at the end.

68B0160A-09B0-408B-A2D7-009139846455.jpeg
 
Thanks for this post Custard - very interesting and the chairs are beautiful.
I followed you closely on the other place and am delighted to see a post from you here.
 
Fascinating post, thanks for sharing.

Just to show I read it all, did you mean "drawknives" instead of spokeshaves in the penultimate paragraph?

Custard":3jgtq5rv said:
One final point about shaving. Personally i'd rather do the entire job with a couple of good spokeshaves rather than a bad drawknife. The problem with most used drawknives is that the backs are pitted, which makes sharpening them almost impossible. By all means do look, good used examples can occasionally be found, but be realistic. The hard fact is that most of the spokeshaves on Ebay will never be turned into an efficient and accurate tool.
 
Dr.Al":zyf5rg6x said:
Fascinating post, thanks for sharing.

Just to show I read it all, did you mean "drawknives" instead of spokeshaves in the penultimate paragraph?

Custard":zyf5rg6x said:
One final point about shaving. Personally i'd rather do the entire job with a couple of good spokeshaves rather than a bad drawknife. The problem with most used drawknives is that the backs are pitted, which makes sharpening them almost impossible. By all means do look, good used examples can occasionally be found, but be realistic. The hard fact is that most of the spokeshaves on Ebay will never be turned into an efficient and accurate tool.

Oops! My mistake Dr Al, I've corrected the paragraph accordingly.
 
If you don't mind I would like to put my efforts in the frame, had to it dig out from the "need to finish" pile from I would guess 25 years ago, ash seat and legs, I have since found the missing stretcher so It could be made safe to sit on :? if I get all the legs in the right way!

chair.jpg

I remember buying the Jack Hill chair book which inspired me (but not enough to finish it)
 
Thanks to Pete Maddox for the perfect segue, I'm glad he showed his beautifully home crafted tapering tool because tapering is what I'd like to come onto next!

What defines Windsor furniture is that the legs and other components are socketed into the seat, so instead of square mortice and tenon based joinery you basically just use a drill. But before starting you need to be clear about which of three alternative routes you will follow. You could simply drill a hole and then turn a straight sided cylinder that fits tightly into it. This is by far the easiest option, but it doesn't make the best and most durable joint.

The next option is to drill a hole, and then use a "reamer" to change it from a straight sided hole into a tapered hole. This means the leg is wedged into the hole, and every time someone sits in the chair they effectively tighten it all up. However, there are two alternatives for reamed holes. You can use a coarse reamer, which uses an included angle of about 12-14 degrees. Or a fine reamer with an included angle of about 5-8 degrees. By the way "included angle" means the total angle of both sides of the reamed hole added together.

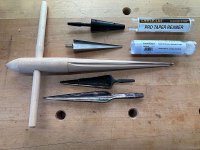
Let's take a look at a few different reamers which should make things clearer.

Windsor-Chair-06.jpg

At the top are two "coarse" reamers from Veritas, I think these are about 14 degrees, in other words each side of the reamer is at about 7 degrees, so the total included angle is 14 degrees. The difference between the two Veritas tools is that one only fits into a brace while the other can be used in either a hand brace or a power drill.

In the middle is a wooden "fine" reamer that I made, with an included angle of about six degrees. Actually I say I made it, I made the wooden body but I bought the blade from an American Windsor chair maker called Elia Bizzarri. You can read much more at his excellent web site here,

https://handtoolwoodworking.com/reamers/

There's no particular difficulty in making the blade, many people cut one out from a saw blade, so you can either make the entire tool yourself, just the body, or you can buy the finished tool from Elia.

And at the bottom of the photo are two antique reamers, one coarse and one fine, that I used on the Windsor chairs I was making forty years ago. I've stayed in contact with a reasonable number of the chairs I made back then, and I'm happy to say none of the joints have ever failed. So these old reamers did the job perfectly satisfactorily. None the less, I wouldn't recommend using them now, I think the other reamers in the photo will serve you better.

So what's the practical difference between a coarse taper and a fine taper? Well, to my mind there are two main issues. The first is that a finer taper gives a tighter fit (think of the ultra fine taper used on the morse taper in your pillar drill or lathe), but increases the risk of splitting the seat. In practise a leg made from a hard wood such as Oak or Ash fitted into a softer seat made from Poplar or Pine or even Elm, is unlikely to risk a split, even with a 6 degree included taper. But an Oak or Ash leg into an Oak or Ash seat is a different matter, 6 degrees would then be too fine and prudence would suggest a 12 or 14 degree taper.

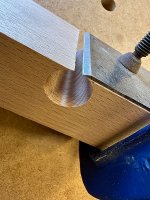
The second difference is aesthetic. Let's say we've drilled a 5/8" hole through a 2" thick seat, and then we want to ream it out. If we use a 14 degree tapered reamer, by the time we've reamed all the way through to the very top surface we'd be left with a hole that about 1 1/8" diameter on the bottom surface. And the problem is that's just too big. Designing an elegantly turned leg with a 1 1/8" diameter top turning is a tough demand. So the only alternative is to drill a smaller hole in the first place. In practise you'd need something like a 3/8" hole to work with a 14 degree reamer. And to my eye that 3/8" hole on the top surface of the seat just looks weird, like four silly little dimples on your beautifully saddled seat. In reality you need at least 5/8" holes for a well balanced design.

So the choice you've got as a maker is use a straight hole, but that's not the strongest solution. Use a coarse tapered reamer but with a shallower seat (say about 1 1/4") but then you need a hardwood seat to give you sufficient strength and you'll have to do without the lovely deep saddling that gives a Windsor chair so much of it's drama and visual impact. Or, do what most makers do, and go for a fine tapered reamer.

Having decided on your reamer, and having made or bought the tool. You still have to form a perfectly matching taper onto the leg. Back in the day craftsmen would aim to hand turn a flawless taper on a lathe. I'm simply not that good a turner. Having looked at many antique Windsor chairs I'm not entirely convinced all of them were actually that good either! But that's a separate story for another time. What I do, and what most craftsmen do today, is to use the reamer to make a perfectly matching tapering tool. Pete Maddox showed his very elegant design. I'm afraid my versions are a lot more pedestrian, but they still get the job done.

Windsor-Chair-07.jpg

Windsor-Chair-08.jpg

Here's an article from another American Windsor Chair maker, Tim Manney, showing how he makes a similar tapering tool.

http://timmanneychairmaker.blogspot.com ... tenon.html


It only takes about half an hour to knock one out and the results are an absolute precision match between the tapered hole (the mortice) and the tapered leg (the tenon), a fit that's so good you can assemble the chair without glue and it'll still function perfectly well.

Of course, if you're in a hurry and don't want to make a tapering tool you can buy a much more elegant version of the finished tool, and for the coarse Veritas style reamer there's also a matching Veritas tapering tool.

A final few points about reaming tools. You'll find lots of engineering reamers for sale, but unfortunately I've never found one that's quite wide enough at the thick end. 5/8" is my target and all the engineering reamers that I've seen top out around 1/2". You also see lots of antique reamers that are short and squat, with an extremely coarse taper (say 18-24 degrees), I'm not certain but I think many of these were designed for fitting bungs into barrels. Again, interesting tools, but not what we as chair makers are looking for.

Okay, I'll leave it there for the moment. And pick this up later with a look at what drills to use.

Cheers everyone.
 
Cabinetman":2lwair50 said:
That settee is really something Custard, beautiful colour too. I went on one of the aforementioned 3 day courses and produced a super Windsor chair, the seat profile is very similar to yours. Re wanting the ends of the spindles dry for tenoning, on the course we split and turned from wet then put all the parts into a polythene tent overnight with a dehumidifier, the wood was almost dry the next day when we put it back on the lathe to finish to size. Agree re the faceting.
The other clever thing we learned was to size the tenons using an open ended spanner, so much easier.
I was as pleased as anything to be able to take this home at the end.


Now that's a very pretty thing, and such a perfect match for the painted side table. Nice job!
 
I've made a few chairs, never a Windsor.

What bugs me, is if you have tapered, through tenons, yes they are self-tightening as you sit, but the top of the tenons will then become proud of the seat over time and in dry weather. Could be uncomfortable or snaggy ? And if they are both tapered and wedged, are the wedges effective with the taper essentially the wrong way ? Perhaps as an engineer I'm overthinking it
 
You can get large engineers reamers this is the one I use around an 1” at its widest part.

0FE7D319-77C1-4506-A502-74FE8370A31F.jpeg
 
Doug":2p6d1xqw said:
You can get large engineers reamers this is the one I use around an 1” at its widest part.


Sorry Doug, my mistake. The tapered hole is 5/8" at the small end, so what's actually needed is a reamer that's at least 1 1/4" at the thick end, probably 1 3/8" to have a safety margin for the occasional thicker seat. But if you know of a supply of engineer's reamers that go up to these sizes please post a link.

Cheers.
 
Sheffield Tony":1tpzzz8l said:
I've made a few chairs, never a Windsor.

What bugs me, is if you have tapered, through tenons, yes they are self-tightening as you sit, but the top of the tenons will then become proud of the seat over time and in dry weather. Could be uncomfortable or snaggy ? And if they are both tapered and wedged, are the wedges effective with the taper essentially the wrong way ? Perhaps as an engineer I'm overthinking it

I hear your concerns, but in practise it's just not a problem. Even on antique Windsors the shrinkage protrusion is pretty small and isn't uncomfortable, and wedging at the top forces the harder leg into the softer seat and results in a leg that's very secure.
 
Superb educational post Gary.

I struggled to find a reamer to fit tapered bronze and brass taps to a number of oak barrels. Wish you had done this thread before then, as I couldn't find a reamer, had no idea of the angle despite having the old taps to hand.....so made a template, drilled straight and used a rasp to get the angle. Worked perfectly well, but took ages.

A few weeks later I was in an antique shop in Rye, and found a reamer for fitting taps to barrels. Was very expensive at £2 but after a touch up with a diamond file, works well.

A while after that, I was in the shop of a furniture restorer (mainly polisher) who introduced me to a bit of historic house work a few years ago and helped me quite a lot. He made what he called 'bent through' chairs in years gone by, and he said that after cutting the taper it was usual to use a burnisher to "burn in" the hole. This was done with either a bronze taper (no blades) or an ebony one, that was rubbed into the hole with a brace. I forgot to ask him the purpose, and to my great regret he died whilst I was in Germany over Christmas. He was still working part time (3 days a week) in early December when I left and I thought he was 82 (because that is what the cheeky old devil told me). After he died I discovered he was 94.

Sorry, not intending to digress.
 
Sheffield Tony":2yspra27 said:
I've made a few chairs, never a Windsor.

What bugs me, is if you have tapered, through tenons, yes they are self-tightening as you sit, but the top of the tenons will then become proud of the seat over time and in dry weather. Could be uncomfortable or snaggy ?

If someone dropped a pound coin on the seat and you sat on it do you think you'd notice?
 
Custard":3imtlg1i said:
Having decided on your reamer, and having made or bought the tool. You still have to form a perfectly matching taper onto the leg. Back in the day craftsmen would aim to hand turn a flawless taper on a lathe. I'm simply not that good a turner. Having looked at many antique Windsor chairs I'm not entirely convinced all of them were actually that good either! But that's a separate story for another time. What I do, and what most craftsmen do today, is to use the reamer to make a perfectly matching tapering tool. Pete Maddox showed his very elegant design. I'm afraid my versions are a lot more pedestrian, but they still get the job done.

When I made a stool the other day with the tapered reamer, I turned the legs to have a taper which involved a bit of trial and error to get the fit just right. I have no idea why I didn't just think of drilling a hole, reaming it and then attaching a plane blade as you and Pete have to have a perfect shaving tool.

Next job on the list!
 
Custard":1ah3vwl2 said:
Doug":1ah3vwl2 said:
You can get large engineers reamers this is the one I use around an 1” at its widest part.


Sorry Doug, my mistake. The tapered hole is 5/8" at the small end, so what's actually needed is a reamer that's at least 1 1/4" at the thick end, probably 1 3/8" to have a safety margin for the occasional thicker seat. But if you know of a supply of engineer's reamers that go up to these sizes please post a link.

Cheers.
I don’t really use the Internet for engineering equipment because locally we have such good suppliers but a quick google bought up these
https://www.arceurotrade.co.uk/Catalogu ... dNEALw_wcB
 
The last part of the Windsor Chair jigsaw puzzle is selecting the drills and bits.

With "staked" or Windsor style furniture, where the components are all socketed into the seat (or table top, etc), then your drill is effectively your jointing machine, a kind of pre-industrial Festool Domino! So it's worth a bit of thought on choosing these before starting a project.

The first question is do you want to work in imperial or metric?

Most of us on this forum are of an age where we're pretty much "bilingual", and can work in either. In fact I guess many of you are like me, and tend to use a bit of both. So, even though I run a metric workshop (ie, all my machines are calibrated in millimetres) I primarily make Windsor chairs using imperial dimensions. One of the reasons is that I use a lot of the Windsor chair designs developed by Curtis Buchanan, I'll evolve them to suit my own needs, but Curtis's plans are the jumping off point. And they're all in imperial.

If you've never come across his work before it's well worth a look, as well as his plans he's also made available a series of educational videos that walk you through the entire process. I tend to follow his designs more than his processes. That's not to say they're wrong, he's an extremely talented maker. But he's a bit too talented, and because I don't make Windsor chairs as frequently as Curtis I tend to use a few more jigs and fixtures to guarantee the same degree of accuracy. Anyhow, do take a look at his website here,

https://www.curtisbuchananchairmaker.com

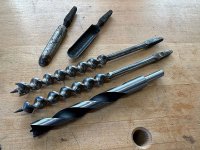
So, back to the choice of drills and bits, which is something else that may well determine your imperial/metric decision. Let's start by taking a quick look at some of the main bit options,

Windsor-Chair-09.jpg

At the top are a couple of spoon bits, below that is an auger, below that is a Cook's or Gedge's Pattern auger, and finally below that is a brad point drill bit. Most obviously missing from this list are Forstner bits, but I'll tackle them separately.

Nearly forty years ago, when I first started making Windsors, the great experts were people like Jack Hill and Vic Taylor, but in 1984 Mike Dunbar arrived with his magisterial volume, "Make A Windsor Chair", where for the first time someone walked us through the entire process in sufficient detail to actually make a chair from scratch with no prior knowledge.

Mike championed the use of spoon bits, chiefly because they can enter the timber at extreme angles, so that's what I set out to use. There were no new spoon bits for sale back then, and it was difficult finding decent used examples in the pre-Ebay era. Most spoon bits were badly pitted and barely useable. But eventually I assembled a halfway decent set and mastered sharpening them. A few years later a tool maker, it may have been Bristol Design Tools, manufactured a complete set of imperial spoon bits. It felt like all my Christmases had come at once!
However, after that first ten years of making all my Windors with spoon bits I no longer use them, nor for that matter do most Windsor chair makers working today. So why the collective change of heart?

I suspect a few things. Spoon bits aren't easy to precisely locate, you tend to start the hole perpendicular and then swivel around to the correct angle. And during that swivelling action it's easy to walk a little ways off from the precise entry point you wanted. Next, they don't cut the cleanest of holes. That won't matter much for your first one or two chairs, but once you get more experience you aim for perfection, plus if you're selling the chair then higher standards apply.

Another criticism is that they have to be used with a brace, which isn't always optimal, and the "tang" or whatever you call the brace mounting component of the bit, isn't always concentric with the cutting circle. Consequently you can end up drilling fractionally different sized holes each time the bit is tightened into the brace in a different position. It's not the end of the world, after all we should be fitting the tenon into the mortice (to follow the cabinetmaker's axiom, "first make the hole then make the thing that goes into the hole"). However, in practise most of us will have a test hole already drilled into a scrap of plywood, and we'll match our tenon components to that. So we need consistency.

Again, going back to the first chairs I made, for drilling the angled holes for legs and spindles into the seat, I generally used Forstner bits in a drill press. I would use a tilting sub-table and pencil a sighting line onto the seat blank.

Many people instinctively reach for the same method today. But again, it's a technique that I've now abandoned. Don't misunderstand me, it gets the job done, but I've concluded that it promises more accuracy and consistency than it actually delivers. The first thing is that visually lining up a sight line so it's plumb with the axis of the pillar drill will only ever be accurate to within a couple of degrees. You'd think it would be spot on, but it rarely is. The second problem is that Forstner bits have only a short spike in the centre for locating the hole. You don't have to be at much of an angle and you're forced to estimate where you're going to be drilling, beyond about eight or ten degrees and you won't get the reassurance of dropping that centre spike into a pre-made bradawl mark. However, if you're determined to go the Forstner/Drill Press route there is a Forstner bit that you might want to investigate.

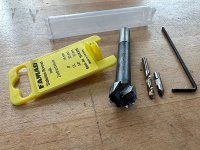
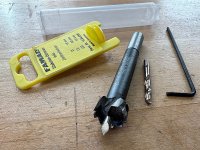
This is the Bormax Prima Pilot from Famag. As you can see from the following photos it has two removable options for the centre point; a spike and a pilot drill bit. These make it the only Forstner that you can precisely locate at the kind of angles you'll need for Windsor chairmaking. Despite working in a power drill or a brace there are two sizeable negatives (there's always a "but"!). They're not cheap, and they're metric only.

Windsor-Chair-11.jpg

Windsor-Chair-12.jpg

That's enough for the moment. I'll pick this up again and carry on discussing the drills and bits that I use for Windsor chairmaking.
 
Great post!
I'll offer a couple of belated footnotes:

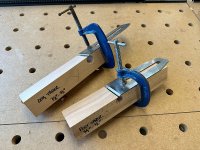
Rounders - I like the stark simplicity of the hole and cramp design. About seven years ago, I was in Bristol Design and spotted something along very similar principles:

20140813_113922_zpsdky0loxu.jpg

20140813_113943_zps8gmaitat.jpg

20140813_114005_zps75jqp8ot.jpg

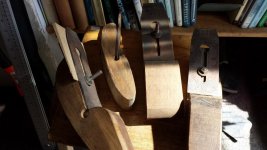
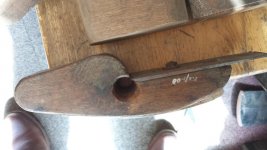
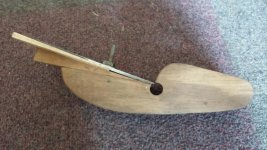
I reckon that whoever made these had found some unwanted old wooden planes, which supplied the irons and the matching lumps of seasoned beech. I wouldn't advocate destroying usable old tools, but it could be a kindness to some basket cases to rehabilitate them this way. The third photo shows what to do if you get the angle wrong.

And with regard to the Spoon Bits, Clico used to make them - and Bristol Design used to sell them, but haven't had any stock for several years now. They were one of several lines that were dropped when Clifton was bought out by Thomas Flinn.
 
Funnily enough, following inspiration from Custard's and Pete's posts I made one this weekend out of a piece of Iroko and a spare plane iron. A bit fiddly to get it to work just right but once you get it right it works a treat, much better than the trial and error method I was doing with the lathe last time.

AP6Rt8t.png

JqqOvE4.png
 
I wonder if I have just found a use for the timber I felled and had planked back in the summer 2020. Most of it is douglas fir with a few boards of black pine.
Comments welcome as to it’s suitability for chair making.
 

Attachments

  • E513A4DD-E5E8-4109-8C60-CF836A3AB634.jpeg
    E513A4DD-E5E8-4109-8C60-CF836A3AB634.jpeg
    644.2 KB · Views: 1,601
Personally I wouldn't use Fir for chairmaking. It's too soft for legs or spindles, and splits too easily for seats.

However, Douglas Fir is becoming an increasingly fashionable furniture wood. Furniture makers are abandoning tropical timbers on environmental grounds, plus all the most prestigious shows and awards (ie the Guild Mark from the Furniture Makers' Company) have pretty much stopped accepting entries made from tropical timbers. That's pushed makers towards temperate zone timbers like Oak or Ash, but many makers have leapfrogged over these traditional furniture woods, and are embracing softwoods.

Douglas Fir is a real winner from this, in particular the very straight grained, quarter or rift sawn boards with their distinctive grain pattern.

So, I'd be saving your Duggie Fir supplies for a furniture project!
 
I mentioned in my last post two different types of auger bit, and in particular a Gedge or Cooks pattern auger. If you dig into the Windsor chair literature you'll find a few quite influential makers enthusing about these augers, mainly because they cut very clean entry holes even when the drill is canted over at an angle. The inevitable result of these glowing reviews is that supplies have disappeared and prices have skyrocketed! I'm not aware of any manufacturer making a new Gedge pattern auger, so we're constrained to stock that's probably a hundred years old or older.

However, my experience is that a good quality, freshly sharpened Irwin or Jennings pattern auger will deliver almost the same result at a fraction of the price. The trick is sharpening the spurs correctly, and then keeping them in first class condition. However, if you're adamant that you want a Gedge or Cooks pattern auger, then I'd argue that you only really need two sizes, a 3/8" and a 5/16". The reason being that the tiny advantage of these bits is only seen when drilling the outside holes at steep angles through a Windsor's back bow. See the photo that Cabinetman posted earlier in this thread, it's just the outside pair of spindle holes where they pass through the bow that are really prone to tearing out.

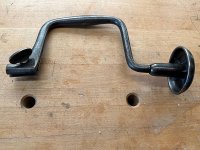
All these traditional augers can only be used in a brace. Most decent braces will do the job, but in my experience good quality pre-war braces are better than modern cheap braces, mainly because you've more chance of the chuck being concentric on the older tools. My favourite brace is actually this one, a Spofford brace, which has to be the simplest (and probably cheapest) brace of them all,

Windsor-Chair-14.jpg

I like the Spofford style tool because it's so light and convenient, I know a few boat builders who use them because they don't take up much room in a tool box. It's a shame that you don't see them much any more. However, pretty much any half decent brace will get the job done, so I really wouldn't hesitate to use whatever you've got.

Now, as well as brace operated auger bits you can also find augers for power drills. As you'd imagine, this is quite a contentious issue! I make chairs with both hand braces and also with cordless electric drills. The huge advantage of a cordless drill isn't speed or power, it's really about just one thing. A brace requires two hands, where as you can use a cordless drill with one hand. And there are occasions on a Windsor chair build when holding a component or a jig in your left hand whilst drilling with your right is a useful advantage.

However, the big problem I find with augers in power drills is that the auger's lead screw pulls the bit into the workpiece way too fast. Even running the drill at a slower setting doesn't really solve this problem. It's not too bad where the hole passes right through, but drilling a stopped hole is too risky. In fact I don't like stopped holes with augers at all. Think about the holes for the stretchers between the legs. These are stopped holes, and usually need to be about 1 1/8" deep in components that are often about 1 1/2" in diameter. Then look at the length of this lead screw on a Gedge pattern auger, versus the brad point on a spur drill,

Windsor-Chair-10.jpg

You can easily see that the long lead screw on the auger means you won't be able to drill to the full 1 1/8" depth, so if you want to use an auger you'll have to compromise on strength with a 7/8" or 1" deep hole, plus you'll still have to be pretty accurate about stopping drilling or the lead screw will burst out of the far side of the stretcher!

That's why I personally favour a brad point drill bit for stretchers. But I also want to work in imperial dimensions, so need a 5/8" brad point bit. They are available in the US, but in Europe they're almost impossible to find. Almost...but not quite!

Fisch, the German maker, offers some excellent imperial sized brad point bits (oddly they're listed as the metric equivalents, so a 5/8" is sold as a 15.875mm bit!). Axminster stock the smaller sizes in this range, up to 1/2", but if you give them a phone call they'll order in the 5/8" bit.

https://www.axminstertools.com/fisch-st ... a38af02b10

Now, let me digress for a moment. As a young man I heard old cabinet makers taking about going "from the paper to the wood". What they meant was that point in a build where you stop reading dimensions from the paper plans, and start lifting dimensions from the physical piece of furniture in front of you. It was an acknowledgement that minute variations creep in to every build, and at some point it makes sense to recognise this rather than stubbornly sticking to a plan which may well become increasingly irrelevant.

This is never truer than with chair making. It doesn't matter how good a craftsman you are, or how carefully you've worked, a chair with its many angles but with so few reference surfaces, will inevitably diverge from the plans fairly early in the build. Consequently when I come to make the stretchers I work not from the paper, but from the wood. Firstly I measure the length of each individual stretcher direct from the dry assembled legs (dry assembly just means unglued, it's not referring to the moisture content of the wood!). Then I turn that stretcher on the lathe to that particular length.

Obviously this means batch production, at least for the entire chair, is a non starter. But this is how you'll get a chair that will last two hundred years or more.

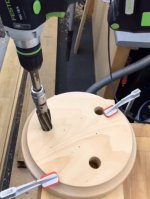
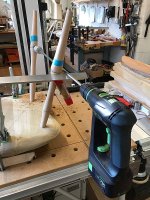
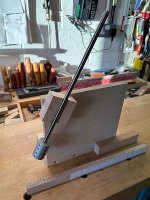
But as well as turning stretchers to length individually, we also need to drill them (or the legs they're socketed into) individually. You can pull the angles from the dry assembled chair, and then set up an adjustable jig to that exact compound angle. However personally I find it quicker to drill directly. Here's the set-up I use for this,

Windsor-Chair-03.jpg

As you can see, I use a power drill for this, but the important thing is how I "sight" to get the correct angle. On virtually all legs and stretchers you'll turn a scribed line or a small v-groove to show the location of the stretcher holes. So you know that drilling in a straight line from one scribed line to another gives you the perfect angle. But instead of putting the cordless drill between the two legs and guessing the angle, by using a long extension, as seen in the photo, you're guaranteed a precise result.

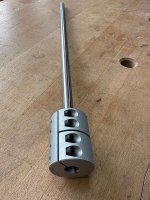
The issue then becomes how to make the extension? This photo shows how I went about it.

Windsor-Chair-04.jpg

I bought a 500mm long silver steel rod (easily found on Ebay), and connected it to a brad point bit with a "rigid shaft coupler". Again, many of these are easily found on Ebay. However, the 5/8" Fisch brad point bit I mentioned earlier has a 3/8" mounting shaft (I guess it's reduced down to 3/8" so it will fit directly into the smaller chucks found on most cordless drills). So I had to order a 3/8" to 3/8" rigid shaft coupler from a Chinese Ebay supplier. But apart from a wait of a couple of months it all worked out. Incidentally if anyone knows a UK engineering supplier who stocks this particular size of coupler I'd be grateful for that information. So I ended up with a cordless drill, a 500mm long 3/8" diameter rod, a 3/8" to 3/8" rigid coupler, then a 5/8" brad point drill. All supported on a length of angle aluminium bracket at the drill end, and at the bit end the leg is rotated by a few degrees so the hole is located centrally. All I can say is that after many chairs this has worked beautifully for drilling stretchers, quick, accurate and virtually foolproof!

But armed with that same rod, coupler, and 5/8" bit there's actually quite a bit more that you can do.

I mentioned in a previous post that I've stopped drilling the seat holes with a pillar drill. Sometimes I use a brace and auger, just to "keep my eye in". But most times I use this very ingenious jig developed by Peter Galbert,

Windsor-Chair-05.jpg

You can read more about this in Peter's own words and download the plans here,

https://www.petergalbert.com/pdf

I think there's a small measurement mistake on Peter's plans, but you'll spot it before you start to make the jig, and in any event it's worth making the jig to fit your drill, rod, and coupler. So I'd source these components before making the jig. Incidentally, you need a good quality steel rod that's accurate, so tool steel is probably justified. The critical thing is that when you spin up the drill the very tip of the brad point is stationery, if it describes small circles in the air then the set-up isn't concentric and you should try alterations (like rotating the shaft 15 degrees in the chuck, or rotating the bit 15 degrees in the coupler) until it's running true.

One last point. I've talked at length about drilling holes, But what about sizing components accurately to fit in those holes?

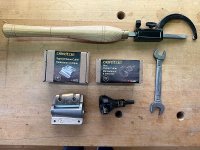
The legs (and the outside back posts if you build a side chair) are all tapered, at least on my chairs, so the tapering process takes care of the fit. But the spindles and the stretcher components aren't tapered. There are innumerable options, such as these,

Windsor-Chair-13.jpg

At the top is a Sorby turning gauge, below that are two Veritas sizing options (imperial only), and in the bottom right is a simple AF spanner. The spanner option was previously mentioned, and it's pretty good. However, there's no guarantee that your drill bits will match accurately to any fixed device like a spanner, which is why I prefer something variable. I get the impression that quite a few chair makers use the Veritas tools, I can understand why but for anyone tempted to try them they need a fair bit of practise before you can reliably centre them on a component. However, simple cheap solutions are perfectly adequate. I like cutting test holes in a scrap of good quality 1/2" ply with the actual bit that I'll be using, and then test fit components to that. I aim for a whisker oversize and then abrade the surface with 80 or 120 grit sandpaper until it fits correctly.

Anyhow, that probably covers it. I've got quite a few more Windsor chairs to make on current commissions, so if anything interesting crops up I'll try and remember to take a snap and post it here.
 
Andyp":3untbnl7 said:
What are your thoughts on Black Pine?

I'm not familiar with it I'm afraid, but they look like really good boards. I'd be well pleased to have those in my wood store!
 
:text-goodpost:
:text-bravo:
:obscene-drinkingcheers:
 
Thanks Custard, comprehensively informative as always. I will be coming back from the States in a couple of months if there are any Imperial drill bits you would like. There’s a lot more to building what "appears "to be a simple chair than I remembered from when I did mine.
And it’s a very very long time ago when I built my first one with arms and rockers for my A level project!
I must have been mad to try it as I had the arms extending all the way round in a hoop, same with the back down to the seat, and the spindles all lined up with the shape of the arm hoop, and followed the shape of the seat! It worked amazingly enough and comfortable as well.
 
Really enjoying the posts Custard, they've come at an opportune time for me as I explore the subject.

This is my current work-in-progress, don't look too closely as there are plenty of "happy accidents". Still not sure what to do with the top as of yet, I definitely will chamfer the bottom and take the corners off, but I'm not sure if I should give it a bit of a dish on top or leave it flat.

ci2ShX1.png

I've never heard of a "Gedge" or "Cook" pattern auger before so that's an interesting one, have you tried the Star-M "F-Type" drill bits? They're like a conventional jobber bit with a brad point on the end, I haven't tried one myself but I have heard good things about them.

https://www.workshopheaven.com/star-m-japanese-f-type-bit-singles/
 
Wow, Dan, are you getting ready for power cuts? Another good-looking hand tool project! I have negligible experience of doing it (once, decades ago) but I do know that shaping a seat with an adze is really satisfying.

As for the brace bits, I'll just post a link here. It goes to a discussion on another forum some of us used to visit.
https://www.ukworkshop.co.uk/threads/ge ... it.120288/
 
AndyT":3dtj22iy said:
Wow, Dan, are you getting ready for power cuts?

All this handwork is making me feel dizzy, I may need to lie down... :lol:

AndyT":3dtj22iy said:
I have negligible experience of doing it (once, decades ago) but I do know that shaping a seat with an adze is really satisfying.

One thing that struck me when I started looking up old tools for doing this kind of thing was how bloody expensive they were! Scorps/inshaves seem to be non-existent and if there are some for sale they are very heavily priced, and they sell. Adzes that aren't of the size that you swing overhead at your feet are uncommon and also quite expensive.
 
You're not wrong. I was on a short course, using the tools provided. I think Custard's suggestion of a big gouge is very sensible.
 
Back
Top