• Hi all and welcome to TheWoodHaven2 brought into the 21st Century, kicking and screaming! We all have Alasdair to thank for the vast bulk of the heavy lifting to get us here, no more so than me because he's taken away a huge burden of responsibility from my shoulders and brought us to this new shiny home, with all your previous content (hopefully) still intact! Please peruse and feed back. There is still plenty to do, like changing the colour scheme, adding the banner graphic, tweaking the odd setting here and there so I have added a new thread in the 'Technical Issues, Bugs and Feature Requests' forum for you to add any issues you find, any missing settings or just anything you'd like to see added/removed from the feature set that Xenforo offers. We will get to everything over the coming weeks so please be patient, but add anything at all to the thread I mention above and we promise to get to them over the next few days/weeks/months. In the meantime, please enjoy!

Staircase upgrade - ...

HOJ":39yjnc5d said:
Another example, not stolen off the internet!

It's more straightforward when the staircase is a cut-string staircase like yours, rather than an enclosed one with trenched strings that makes for a little more of a drop on the first tread with the gap of the now missing newel, as well as having never being designed for this kind of setup in the first place :lol:
 
Trevanion":32crtb9p said:
It's more straightforward when the staircase is a cut-string staircase like yours,
Agreed, just wanted to show off :eusa-whistle:

Andyp":32crtb9p said:
Can I ask though why one of those spindles is so different to the rest?
The odd one is a newel post which in this case gives the handrail more structure especially as there is a tendency to use it as leverage to take the first steps.
 
Without any reference points, it's hard to judge the exact dimensions of the handrail profile that I'm trying to recreate. So I started off with simply a large length of wood approx 70mm square. Guessed the top convex radius to be about 60mm and so ran that through the spindle moulder, the two scallops on either side of it made from a 25mm radius cutter...another couple of passes.

I estimated the vertical flats and spacings. Got hold of a few large dowels of differing radii , sliced pieces off them with the bandsaw and offered them up. Finally settling on a 35mm dia dowel. The smaller radius on the very bottom is 5mm.

Glued them all on, stained it up a little, sanded and waxed it and offered it up to Chief Designer. It fitted my big hands but not hers. So gradually took slices out of the middle to reduce the width and now it's spot on. It feels very comfortable in the hand and, though I say it myself, a very passable replica of the original.


Spent an hour or so measuring up and making the drawings for the cutters.


Next up, work out how much ABW to get and whether or not I want to spend an awful lot of spondoolicks to also buy a very wide length so that the wreath and curves etc can come out of one piece rather than glue pieces together to get the width. The plus point is it gives me over 2m to play with after Horlicks 1, Horlicks 2, .....Horlicks 3 etc

With regard to these, I'm wondering whether or not I can use one of those flexicurves to get me started in the right direction rather than make my small brain ache trying to understand what all this tangent stuff is all about.
 
I'm sure that in a modern workshop set up for doing this sort of thing, all the curves are worked out in 3 dimensions in advance of using a single tool. I'm also certain that 100 years ago this would have been done with a whittling-down-and-fairing approach.
 
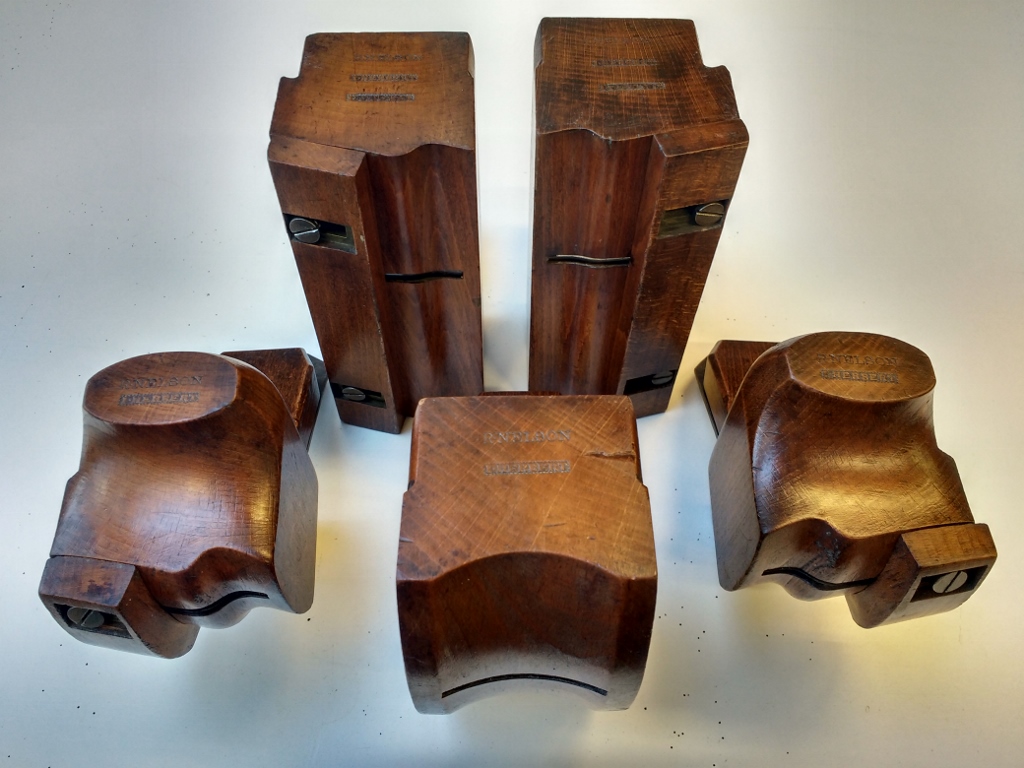
This might be the right time to include this picture of some handrail planes, which would have been used for the straight bits and the big curves.

IMG_20200325_150800967_HDR-1_1024x768_-_Copy.jpg


https://taths.org.uk/tools-trades/queri ... ail-planes
 
Mike G":33zzfgg5 said:
I'm sure that in a modern workshop set up for doing this sort of thing, all the curves are worked out in 3 dimensions in advance of using a single tool. I'm also certain that 100 years ago this would have been done with a whittling-down-and-fairing approach.

Companies like Clive Durose will send someone out to digitise the stair etc and then using their 5-axis CNC machine produce the handrail. For a price !
 
I've taken on board what folk have said about spindle lengths but how to decide what they should be given my problem on the bottom step and the step change in height.

Thinking things through, there is one 'given' - namely the minimum height of the handrail (unless I want to ignore Building Regs ...after all the original handrail was below the requirement).

So I mocked up a handrail at the minimum height as my de facto starting point.

It's also useful for giving me a sense of the wreath shape required on the quarter landing turn. But that's for another day.

Adding a handrail (less a bit to inset the spindles underneath) got me to here.


Then I offered up a spindle on the bottom step to see where it struck the handrail because it is at this point that the handrail needs to be level so it can turn into the volute. And therein lies the rub. It can't be level at this point as it's still part of the slope.


This picture is telling me that that spindle is where it should start to level off. But there's no room on the bottom tread.

There are various options - none of which will look right. I can add an extension to that spindle but it's still too close to the nosing on the tread. I could add even more to the height which would let me mov e it inboard. Perhaps that is the only option.

:eusa-think:
 
A few very poor options I've come up with.

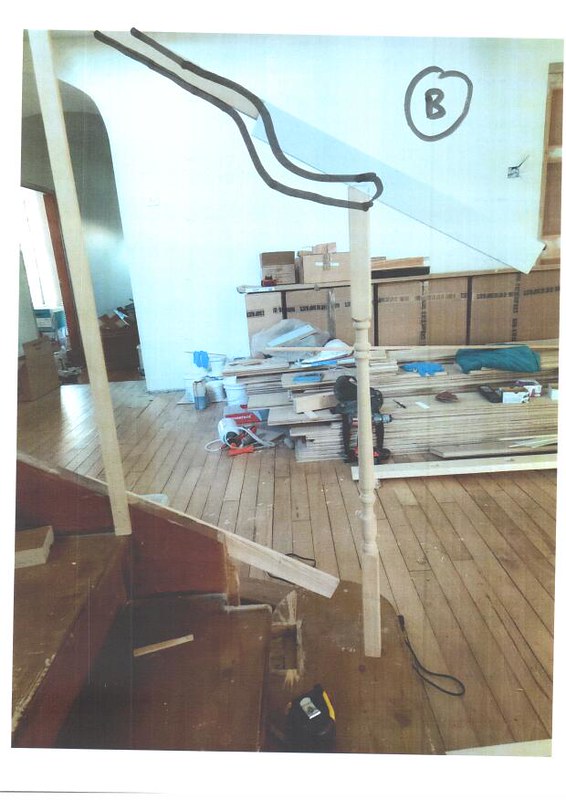
Option A...as mentioned..raise the height. Trouble with that is for it to really work, the height of the volute from actual floor level is 1300m which I think is too high ?


Option B...just looks plain ugly especially going into a volute.


Option C...radical. Turn the handrail and extend it all the way down to the floor. It might work with a round handrail but I don't think it will with my preferred option.

 
I see your problem Roger, I’m afraid the only thing I can think of, probably isn’t what you want to hear, how about turning up a large biscuit tin to sit on the bottom step out of the top of which come the spindles. This would give you the height you require hopefully, not ideal but it would work. Ian
 
TrimTheKing":18mgxaoi said:
Turn, or have turned, a slightly longer spindle(s) for that area. Path of least resistance!

If I go down that route I'll just add on square wood and domino them together. I'll try mocking up something at the extra eight tomorrow as I think that is the only solution unless the forum members can come up with something more creative.
 
Cabinetman":1jnwc4bz said:
I see your problem Roger, I’m afraid the only thing I can think of, probably isn’t what you want to hear, how about turning up a large biscuit tin to sit on the bottom step out of the top of which come the spindles. This would give you the height you require hopefully, not ideal but it would work. Ian

Thanks Ian for reminding me of that option. May well mock that one up as well.

EDIT: Just realised that that solution has the same height issue as Option A ! The end result is the same.. :D
 
Would it be possible to lower the handrail on the lower section so you could place the first bottom tread spindle closer to the riser? I've no idea how much you would have to lower it it, but could it be done?
 
Can you not just do option B but not start the flat section until the rail hits that spindle? Surely the rail could hit that spindle on the straight then immediately turn into the volute?
 
TrimTheKing":2swe7pci said:
Can you not just do option B but not start the flat section until the rail hits that spindle? Surely the rail could hit that spindle on the straight then immediately turn into the volute?

That might just work :eusa-think:
 
Malc2098":3evtpem0 said:
Would it be possible to lower the handrail on the lower section so you could place the first bottom tread spindle closer to the riser? I've no idea how much you would have to lower it it, but could it be done?

That sounds like Option B, Malc.
 
RogerS":2baezls6 said:
TrimTheKing":2baezls6 said:
Can you not just do option B but not start the flat section until the rail hits that spindle? Surely the rail could hit that spindle on the straight then immediately turn into the volute?

That might just work :eusa-think:

Sorry I meant option A.
 
If some one has a copy of George Ellis's book Modern practical stair building & hand railing, there is a picture on page 2 (plate 3) of a handrail with volute, which may help, I cant copy it.

On the basis the volute travels round to match the bottom step, you can start to rise the handrail on the turn of the sweep, difficult to describe.
 
RogerS":lg4qmh4r said:
Malc2098":lg4qmh4r said:
Would it be possible to lower the handrail on the lower section so you could place the first bottom tread spindle closer to the riser? I've no idea how much you would have to lower it it, but could it be done?

That sounds like Option B, Malc.


I meant the whole flight from ground to the return, not just the bottom tread.
 
Does the bottom vertical have to be the same as all the others?

I'm pretty sure I've seen stairs with a nice curving handrail with a more substantial post at the bottom. Not a newel post sticking up above the rail, just a turned post underneath the bottom of the rail, 2 to 3 inches in diameter.

It's also more sturdy when lent on sideways.
 
Thanks everyone. I think Doug's nailed it with that Haldane handrail :text-bravo:
 
Here y'are, Roger. Grab yourself a glass of your favourite and sit back and see how it's done. :)

[youtubessl]keO5AHup7NA[/youtubessl]
 
TrimTheKing":d4n9nkg2 said:
Can you not just do option B but not start the flat section until the rail hits that spindle? Surely the rail could hit that spindle on the straight then immediately turn into the volute?

Well, once the rail line has hit the spindle there would be no need for the handrail to step down. So you have the right answer, I reckon, but applied to the wrong option. I'd say option A then level out......exactly as HOJ describes.
 
It wouldn’t let me watch it all unfortunately, the guy on the bandsaw cutting the round shape isn’t going to keep his full set of Fingers or hands for very long! Gave me the shivers just watching him.
 
Thanks everyone. Starting to come clearer.

I love the fag hanging out of the corner of his mouth !

There's a fair number of videos out there and it's interesting to see the different approaches between East and West. Here in the West, a lot of folk use the tangent system. Many of those in the East simply eyeball everything and JFDI. I'm not sure which way I will go as yet. Probably the latter as every time I try and get to grips with the tangent system, my eyes glaze over and I remember there was something else I should be doing.
 
Mike G":1y7egvfn said:
TrimTheKing":1y7egvfn said:
Can you not just do option B but not start the flat section until the rail hits that spindle? Surely the rail could hit that spindle on the straight then immediately turn into the volute?

Well, once the rail line has hit the spindle there would be no need for the handrail to step down. So you have the right answer, I reckon, but applied to the wrong option. I'd say option A then level out......exactly as HOJ describes.

Yep, I realised that a bit later and corrected it in another post. Trying to do too many things at the same time and mixed up my A & B.
 
So after a small diversion here we looked at drawing up the tangent handrail, I'm now in a position to move on.

I can't do too much though. I needed the drawing to see what cross-sectional area of timber I needed ideally to do the wreaths. It's looking pricey if I do it in one piece (only talking about the quarter-turn at the moment...the others should be smaller). I'm waiting for some stuff to come for me to practice on before making a final decision. Also waiting for the cutters to be made up.

I can carry on working on the bottom tread and also look at making or buying in the base rail. Sometimes it's more cost-effective in terms of time to simply buy in something like the base rail. The only drawback is that, so far, all the ones I've seen are over-wide IMO.
 
HOJ":2s40i4uv said:
If some one has a copy of George Ellis's book Modern practical stair building & hand railing, there is a picture on page 2 (plate 3) of a handrail with volute, which may help, I cant copy it.

On the basis the volute travels round to match the bottom step, you can start to rise the handrail on the turn of the sweep, difficult to describe.

Many thanks for alerting me to this excellent book. :eusa-clap:

Bought a copy and it's explained a lot of the grey areas for me.
 
But still not enough explanation. I haven't got a clue how to transpose the stuff on the tangent hand-railing diagram into something meaningful in terms of cut lines on a block of wood. Ellis may just as well have written in Swahili for all the good it does my fuddled brain. :(

So Plan B., Polystyrene blocks and after a days faffing about, have come to the conclusion that the tangent hand-railing malarkey was never going to work on the quarter turn because it steps down too far between the two flights. It's going to need a sort of gooseneck which is not ideal at all but there you go.

 
Second attempt. Not too bad a 'swerve' at the top. Virtually none at the bottom.


Meanwhile at the back of my mind, I've known that this will eventually tell me what sort of dimensions of ABW I need to make the turn. ABW is not cheap especially when you start to get up to 200x100mm or even 300x100mm. Especially when minimum lengths are 2.4m.

But looking at what I've ended up with using the polystyrene,


it looks a bit like a brick bond and so I'm thinking that maybe that's the route to take, to put in place the straight handrails temporarily fixed in position. Then using epoxy make up a brick bond in situ for the curve...ensuring it mates exactly where the straight handrails end up and the relevant brick Zipbolted into its straight handrail end. Wait for the epoxy to go off then carve, grind, sand the 'brick wall' into submission.
 
The tangent method setting-out is all based on two straight sections that would meet at the corner if you continued them straight on - that diamond shape at the top of the drawing where you lay out the resulting curve represents the resulting plane from the two lines intersecting, and if they don't intersect then that plane doesn't exist.

With that drop between the two, I can see two options - either take a suitably sized block, mark on the places where it meets the straight sections, and eyeball the in-between parts freehand, or try to set it out by tangents in two stages, with an intermediate line at a steeper slope. I suspect that second option would only work on a fairly large, sweeping, curve, though; not the relatively tight right angle you've got there. I think you're on the right track with the polystyrene there.
 
Thank you, Stephen for the clarification. A very key point with tangents that I totally overlooked! At least I got there in the end even if I didn't know why :lol:
 
I'm pleased you've gone down this path, Roger. Making a solid model by trial and error always struck me as the most productive way forward.

One you start shaving that polystyrene to shape, can I suggest you start focussing on centrelines. Connecting up the middle of the top of the various sections of rail, and then off-setting that line to get to the outside edges is going to be easier than trying to work from a face.
 
Roger,

The Asian guy in the video before and in this one I think is the same guy in this one uses laminates, if that's the right word, but only screws the blanks in place to start with and doesn't bond them in place until fairly near the end.

This seems to allow him to dismantle and rough out before putting them back together to line the up for more finer shaping and fettling.

[youtubessl]68HJPtAO35Y[/youtubessl]
 
If anyone is interested in how you actually go about making the wreath from a drawing then take a look at this guys work. For the 'How to' scroll right down to the bottom.

Pity he is in the USA :(
 
Back
Top